
前言
log4j2是基于log4j,Apache参考logback架构实现的一个新的日志系统(感觉Apache很怕logback)。
log4j2 官方文档描述了它的一些优点。
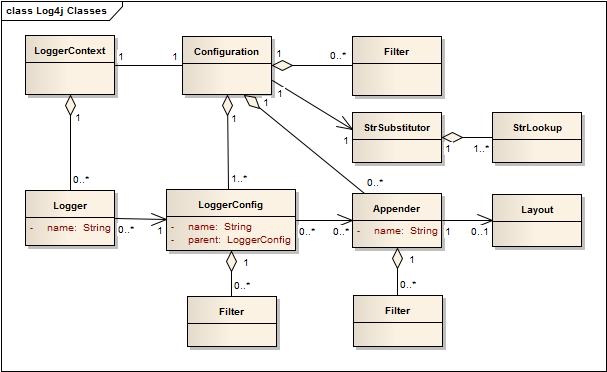
通过所有logback 功能,我们还修复了一些隐藏的问题。目前,log4j2 也使用门面模式进行日志记录。当然,您也可以使用log4j2(尽管不是必须的)。改进:log4j2 包含基于LMAX Disruptor 库的下一代异步记录器,在多线程场景中,其性能比log4j 和logback 提高18 倍。 log4j2 提供Log4j 1.2、SLF4J、Commons Logging 和Java。 util.logging (JUL) API 支持以避免锁定:使用Log4j2 API 的应用程序始终可以选择使用符合SLF4J 的库作为log4j-to-slf4j 适配器的记录器实现自动重新加载配置:Logback,如Log4j 2 ,可以在配置发生变化时自动重新加载。与Logback 不同,发生重新配置时日志事件不会丢失。高级过滤:与Logback 类似,Log4j 2 支持基于日志事件中的上下文数据、标签、正则表达式和其他组件进行过滤。插件架构:Log4j使用插件模式来配置组件。因此,您不需要编写任何代码来创建和配置Appender、布局、模式转换器等。 Log4j 自动识别插件并在配置引用它们时使用它们。属性支持:当您在配置中引用属性时,Log4j 要么直接替换它们,要么Log4j 将它们传递给动态解析它们的底层组件。 Java 8 Lambda 对自定义日志级别的支持会产生更少的垃圾。在稳态日志记录期间,Log4j 2 对于独立应用程序来说是无垃圾的,对于Web 应用程序来说是更少的垃圾。这减少了垃圾收集器的负载并提高了响应时间性能。与应用程序服务器集成:版本2.10.0 引入了log4j-appserver 模块,该模块改进了与Apache Tomcat 和Eclipse Jetty 的集成。 Log4j2类图:
这次我们将在四个地方探索源代码:启动、配置、异步和插件。
源码探索
开始
log4j2的主要组件
LogManager指定一个LogContexFactory,并根据其配置初始化相应的LoggerContext。
LoggerContext1解析配置文件,解析成对应的Java对象。
2. 使用LoggerRegisty 缓存记录器设置
3.配置设置信息
4、start方法解析配置文件并转换为对应的Java对象。
5、通过getLogger获取logger对象。
记录器日志管理器
该组件是Log4J启动的入口点。后续的LoggerContext和Logger都是通过调用LogManager上的静态方法来获取的。您可以使用以下代码获取记录器:
Logger logger=LogManager.getLogger(); 由于LogManager是一个非常重要的组件,因此本节将详细分析LogManager的启动过程。
启动LogManager的入口点是以下静态代码块。
/** * 扫描类路径以获取所有日志记录实现。目前仅使用一种,但*可以扩展以使用多种实现。 */static { //strong制特定日志记录实现的快捷方式绑定。 PropertiesUtil managerProps=PropertiesUtil.getProperties(); Final String FactoryClassName=managerProps.getStringProperty(FACTORY_PROPERTY_NAME); if (factoryClassName !=null) { try { Factory=LoaderUtil.newCheckedInstanceOf(factoryClassName, LoggerContextFactory.class) } catch (final ClassNotFoundException cnfe) { LOGGER.error(‘无法创建配置的LoggerContextFactory {}’, FactoryClassName); } catch (final Exception ex) { LOGGER.error(‘无法创建配置的LoggerContextFactory {}’, FactoryClassName, ex);==null) {final SortedMapInteger, LoggerContextFactory Factory=new TreeMap(); //如果在OSGi 环境中运行,则对ProviderUtil 的下一次调用可能会//阻塞请注意if (ProviderUtil.hasProviders()) { for (final provider) : ProviderUtil.getProviders()) { 最终类? 扩展LoggerContextFactory FactoryClass=Provider.loadLoggerContextFactory(); if (factoryClass !=null) { 请尝试{factory.put(provider.getPriority()) ()); Final Exception e) { LOGGER.error(‘无法创建由提供程序URL {} 指定的类{}’,factoryClass.getName(),provider .getUrl(),e); (factories.isEmpty()) { LOGGER.error (’Log4j2 找不到日志记录实现。 ‘ + ‘将log4j-core 添加到您的类路径中。’使用SimpleLogger 记录到控制台.’); } else if (factories.size()==1) {factories.get(factories.lastKey()) } else {final StringBuilder sb=new StringBuilder(‘Multiple)找到日志记录实现\n’); for (final Map.EntryInteger, LoggerContextFactory 条目: Factory.entrySet()) { sb.append(‘Factory: ‘).append(entry.getValue ().getClass().getName()) ; sb.append(‘, Weighting: ‘).append(entry.getKey()).append(‘\n’); } 工厂=factories.get(factories.lastKey( )); ).append(factory.getClass( ).getName()); LOGGER.warn(sb.toString()); } } else { LOGGER.error(‘Log4j2 日志未找到实现。’ + ‘将log4j-core 添加到classpath.打印日志到控制台.’); Factory=new SimpleLoggerContextFactory() } } } 这个静态代码段主要分为以下步骤:
首先,根据给定的配置文件中的配置信息获取loggerContextFactory。如果没有找到对应的Factory实现类,则通过ProviderUtil的getProviders()方法加载Provider,然后通过Provider的loadLoggerContextFactory方法加载LoggerContextFactory实现类。如果没有从provider获取实现类,且LoggerContextFactory的实现类或provider为空,则使用SimpleLoggerContextFactory作为LoggerContextFactory。根据配置文件加载LoggerContextFactory
//strong制执行特定日志记录的快捷方式绑定。 Final PropertiesUtil managerProps=PropertiesUtil.getProperties(); Final String FactoryClassName=managerProps.getStringProperty(FACTORY_PROPERTY_NAME); if (factoryClassName !=null) { try { Factory=LoaderUtil.newCheckedInstanceOf(factoryClassName) LoggerContextFactory.class); ) { LOGGER.error(‘已配置的LoggerContextFactory {}未找到’, FactoryClassName) } catch (final Exception ex) { LOGGER.error(‘已配置的LoggerContextFactory {}这个逻辑中,LogManager首先检测配置文件,通过“log4j2”获取LoggerContextFactory .component.properties”和配置项“log4j2.loggerContextFactory”。如果用户有相应的配置,newCheckedInstanceOf方法会实例化LoggerContextFactory的对象。如下。
public static T T newInstanceOf(final ClassT clazz) throws InstantiationException, IllegalAccessException, InitationTargetException { try { return clazz.getConstructor().newInstance(); } catch (final NoSuchMethodException忽略) { //FIXME: 检查Class.newInstance() 的代码,这似乎与上面clazz.newInstance(); 中的return 执行相同的操作。默认情况下,没有初始默认配置文件log4j2.component.properties,所以需要从其他渠道获取LoggerContextFactory。
通过Provider 实例化LoggerContextFactory 对象
代码:
if (factory==null) {final SortedMapInteger, LoggerContextFactory Factory=new TreeMap(); //如果在OSGi 环境中运行,则下一次对ProviderUtil 的调用//将阻塞,直到安装了提供程序请注意,这是可能的if ( ProviderUtil.hasProviders ()) { for (最终提供程序提供者: ProviderUtil.getProviders()) { 最终类扩展LoggerContextFactory FactoryClass=Provider.loadLoggerContextFactory(); if (factoryClass !=null) { try {factory.put(provider.getPriority() ), FactoryClass.newInstance()); } catch (final Exception e) { LOGGER.error(‘由提供者URL 指定的类{} { } ‘,factoryClass.getName(),provider .getUrl(), e); } if (factories.isEmpty()) { LOGGER.error(‘Log4j2 找不到日志记录实现。’ + ‘将log4j-core 添加到类路径以使用SimpleLogger 记录到控制台工厂.’); (); } else if (factories.size()==1) {factories.get(factories.lastKey()); } else {final StringBuilder sb=new StringBuilder(‘找到多个日志记录实现: ‘); Map.EntryInteger, LoggerContextFactory 条目: 工厂。 getKey()).append(‘\ n’); } Factory=factories.get(factories.lastKey()); LOGGER.warn(sb.toString ()); } } else { LOGGER.error(‘Log4j2 找不到日志记录实现。 ‘ + ‘将log4j-core 添加到您的类路径中。’使用SimpleLogger.’); Factory=new SimpleLoggerContextFactory(); 登录到控制台;这里更有趣的是hasProviders 和getProviders 都以线程安全的方式延迟加载ProviderUtil 对象。跟进LazyInit 方法。
protected static void lagyInit() { //noinspection DoubleCheckedLocking if (INSTANCE==null) { try { STARTUP_LOCK.lockInterruptically(); if (INSTANCE==null) { INSTANCE=new ProviderUtil() } } catch (final InterruptedException e); { LOGGER.fatal(‘在Log4j 提供程序加载之前中断。’, e); }finally { STARTUP_LOCK.unlock() } } 再看一下构造方法。
这里的延迟加载实际上是Provider对象被延迟加载。创建新的ProviderUtil 实例的过程直接实例化提供者对象。这个过程首先通过getClassLoaders方法获取provider的类加载器,然后通过loadProviders(classLoader)加载类。 ProviderUtil实例化结束时,统一查找“META-INF/log4j-provider.properties”文件中对应的provider URL,并假设该provider已经远程加载。 loadProviders 方法将提供程序添加到ProviderUtil 的PROVIDERS 列表中。您可以看到默认提供程序是org.apache.logging.log4j.core.impl.Log4jContextFactory。
LoggerContextFactory=org.apache.logging.log4j.core.impl.Log4jContextFactoryLog4jAPIVersion=2.1.0FactoryPriority=10 非常有趣的是,这里的延迟加载加了一把锁,
lock这个方法会被中断。 lockInterruptically 和lock 的区别是:
锁和锁悬挂的区别是:
lock 优先获取锁,只有成功获取锁后才响应中断。
lockInterruptically 更喜欢响应中断而不是响应获取常规锁或可重入锁。
ReentrantLock.lock 允许在等待时中断其他线程对等待线程的调用。
使用Thread.interrupt方法中断正在等待的线程并直接返回。在这种情况下,不需要获取锁,但会抛出InterruptedException。即使检测到Thread.isInterrupted,ReentrantLock.lock 方法也会继续尝试获取锁,如果失败则继续休眠。只有成功获取锁后,才会将当前线程设置为挂起状态,线程才会被挂起。
上面有几点需要注意。
/** * 保护ProviderUtil 单例实例免受延迟初始化的影响。这主要用于OSGi 支持。 * * @since 2.1 */protected static Final Lock STARTUP_LOCK=new ReentrantLock(); //STARTUP_LOCK 允许延迟初始化。 OSGi Activator 暂停启动并等待//安装提供程序。请参阅LOG4J2-373。 private static volatile ProviderUtil INSTANCE; 可以看到这是为了阻止osgi启动。
返回日志管理器。
加载提供程序后,您可以看到工厂绑定发生了。
if (factories.isEmpty()) { LOGGER.error(‘Log4j2 找不到日志记录实现。’ + ‘将log4j-core 添加到类路径。使用SimpleLogger 记录到控制台。’ Log.’); (); } else if (factories.size()==1) {factories.get(factories.lastKey()); } else {final StringBuilder sb=new StringBuilder(‘日志记录的多重实现);
ions found: \n”); for (final Map.Entry<Integer, LoggerContextFactory> entry : factories.entrySet()) { sb.append(“Factory: “).append(entry.getValue().getClass().getName()); sb.append(“, Weighting: “).append(entry.getKey()).append(‘\n’); } factory = factories.get(factories.lastKey()); sb.append(“Using factory: “).append(factory.getClass().getName()); LOGGER.warn(sb.toString()); }到这里,logmanager的启动流程就结束了。
配置
在不使用slf4j的情况下,我们获取logger的方式是这样的:
Logger logger = logManager.getLogger(xx.class)跟进getLogger方法:
public static Logger getLogger(final Class<?> clazz) { final Class<?> cls = callerClass(clazz); return getContext(cls.getClassLoader(), false).getLogger(toLoggerName(cls)); }这里有一个getContext方法,跟进,
public static LoggerContext getContext(final ClassLoader loader, final boolean currentContext) { try { return factory.getContext(FQCN, loader, null, currentContext); } catch (final IllegalStateException ex) { LOGGER.warn(ex.getMessage() + ” Using SimpleLogger”); return new SimpleLoggerContextFactory().getContext(FQCN, loader, null, currentContext); } }上文提到factory的具体实现是Log4jContextFactory,跟进getContext
方法:
public LoggerContext getContext(final String fqcn, final ClassLoader loader, final Object externalContext, final boolean currentContext) { final LoggerContext ctx = selector.getContext(fqcn, loader, currentContext); if (externalContext != null && ctx.getExternalContext() == null) { ctx.setExternalContext(externalContext); } if (ctx.getState() == LifeCycle.State.INITIALIZED) { ctx.start(); } return ctx; }直接看start:
public void start() { LOGGER.debug(“Starting LoggerContext[name={}, {}]…”, getName(), this); if (PropertiesUtil.getProperties().getBooleanProperty(“log4j.LoggerContext.stacktrace.on.start”, false)) { LOGGER.debug(“Stack trace to locate invoker”, new Exception(“Not a real error, showing stack trace to locate invoker”)); } if (configLock.tryLock()) { try { if (this.isInitialized() || this.isStopped()) { this.setStarting(); reconfigure(); if (this.configuration.isShutdownHookEnabled()) { setUpShutdownHook(); } this.setStarted(); } } finally { configLock.unlock(); } } LOGGER.debug(“LoggerContext[name={}, {}] started OK.”, getName(), this); }发现其中的核心方法是reconfigure方法,继续跟进:
private void reconfigure(final URI configURI) { final ClassLoader cl = ClassLoader.class.isInstance(externalContext) ? (ClassLoader) externalContext : null; LOGGER.debug(“Reconfiguration started for context[name={}] at URI {} ({}) with optional ClassLoader: {}”, contextName, configURI, this, cl); final Configuration instance = ConfigurationFactory.getInstance().getConfiguration(this, contextName, configURI, cl); if (instance == null) { LOGGER.error(“Reconfiguration failed: No configuration found for ‘{}’ at ‘{}’ in ‘{}'”, contextName, configURI, cl); } else { setConfiguration(instance); /* * instance.start(); Configuration old = setConfiguration(instance); updateLoggers(); if (old != null) { * old.stop(); } */ final String location = configuration == null ? “?” : String.valueOf(configuration.getConfigurationSource()); LOGGER.debug(“Reconfiguration complete for context[name={}] at URI {} ({}) with optional ClassLoader: {}”, contextName, location, this, cl); } }可以看到每一个configuration都是从ConfigurationFactory拿出来的,我们先看看这个类的getInstance看看:
public static ConfigurationFactory getInstance() { // volatile works in Java 1.6+, so double-checked locking also works properly //noinspection DoubleCheckedLocking if (factories == null) { LOCK.lock(); try { if (factories == null) { final List<ConfigurationFactory> list = new ArrayList<ConfigurationFactory>(); final String factoryClass = PropertiesUtil.getProperties().getStringProperty(CONFIGURATION_FACTORY_PROPERTY); if (factoryClass != null) { addFactory(list, factoryClass); } final PluginManager manager = new PluginManager(CATEGORY); manager.collectPlugins(); final Map<String, PluginType<?>> plugins = manager.getPlugins(); final List<Class<? extends ConfigurationFactory>> ordered = new ArrayList<Class<? extends ConfigurationFactory>>(plugins.size()); for (final PluginType<?> type : plugins.values()) { try { ordered.add(type.getPluginClass().asSubclass(ConfigurationFactory.class)); } catch (final Exception ex) { LOGGER.warn(“Unable to add class {}”, type.getPluginClass(), ex); } } Collections.sort(ordered, OrderComparator.getInstance()); for (final Class<? extends ConfigurationFactory> clazz : ordered) { addFactory(list, clazz); } // see above comments about double-checked locking //noinspection NonThreadSafeLazyInitialization factories = Collections.unmodifiableList(list); } } finally { LOCK.unlock(); } } LOGGER.debug(“Using configurationFactory {}”, configFactory); return configFactory; }这里可以看到ConfigurationFactory中利用了PluginManager来进行初始化,PluginManager会将ConfigurationFactory的子类加载进来,默认使用的XmlConfigurationFactory,JsonConfigurationFactory,YamlConfigurationFactory这三个子类,这里插件化加载暂时按下不表。
回到reconfigure这个方法,我们看到获取ConfigurationFactory实例之后会去调用getConfiguration方法:
public Configuration getConfiguration(final String name, final URI configLocation, final ClassLoader loader) { if (!isActive()) { return null; } if (loader == null) { return getConfiguration(name, configLocation); } if (isClassLoaderUri(configLocation)) { final String path = extractClassLoaderUriPath(configLocation); final ConfigurationSource source = getInputFromResource(path, loader); if (source != null) { final Configuration configuration = getConfiguration(source); if (configuration != null) { return configuration; } } } return getConfiguration(name, configLocation); }跟进getConfiguration,这里值得注意的是有很多个getConfiguration,注意甄别,如果不确定的话可以通过debug的方式来确定。
public Configuration getConfiguration(final String name, final URI configLocation) { if (configLocation == null) { final String config = this.substitutor.replace( PropertiesUtil.getProperties().getStringProperty(CONFIGURATION_FILE_PROPERTY)); if (config != null) { ConfigurationSource source = null; try { source = getInputFromUri(FileUtils.getCorrectedFilePathUri(config)); } catch (final Exception ex) { // Ignore the error and try as a String. LOGGER.catching(Level.DEBUG, ex); } if (source == null) { final ClassLoader loader = LoaderUtil.getThreadContextClassLoader(); source = getInputFromString(config, loader); } if (source != null) { for (final ConfigurationFactory factory : factories) { final String[] types = factory.getSupportedTypes(); if (types != null) { for (final String type : types) { if (type.equals(“*”) || config.endsWith(type)) { final Configuration c = factory.getConfiguration(source); if (c != null) { return c; } } } } } } } } else { for (final ConfigurationFactory factory : factories) { final String[] types = factory.getSupportedTypes(); if (types != null) { for (final String type : types) { if (type.equals(“*”) || configLocation.toString().endsWith(type)) { final Configuration config = factory.getConfiguration(name, configLocation); if (config != null) { return config; } } } } } } Configuration config = getConfiguration(true, name); if (config == null) { config = getConfiguration(true, null); if (config == null) { config = getConfiguration(false, name); if (config == null) { config = getConfiguration(false, null); } } } if (config != null) { return config; } LOGGER.error(“No log4j2 configuration file found. Using default configuration: logging only errors to the console.”); return new DefaultConfiguration(); }这里就会根据之前加载进来的factory进行配置的获取,具体的不再解析。
回到reconfigure,之后的步骤就是setConfiguration,入参就是刚才获取的config
private synchronized Configuration setConfiguration(final Configuration config) { Assert.requireNonNull(config, “No Configuration was provided”); final Configuration prev = this.config; config.addListener(this); final ConcurrentMap<String, String> map = config.getComponent(Configuration.CONTEXT_PROPERTIES); try { // LOG4J2-719 network access may throw android.os.NetworkOnMainThreadException map.putIfAbsent(“hostName”, NetUtils.getLocalHostname()); } catch (final Exception ex) { LOGGER.debug(“Ignoring {}, setting hostName to ‘unknown'”, ex.toString()); map.putIfAbsent(“hostName”, “unknown”); } map.putIfAbsent(“contextName”, name); config.start(); this.config = config; updateLoggers(); if (prev != null) { prev.removeListener(this); prev.stop(); } firePropertyChangeEvent(new PropertyChangeEvent(this, PROPERTY_CONFIG, prev, config)); try { Server.reregisterMBeansAfterReconfigure(); } catch (final Throwable t) { // LOG4J2-716: Android has no java.lang.management LOGGER.error(“Could not reconfigure JMX”, t); } return prev; }这个方法最重要的步骤就是config.start,这才是真正做配置解析的
public void start() { LOGGER.debug(“Starting configuration {}”, this); this.setStarting(); pluginManager.collectPlugins(pluginPackages); final PluginManager levelPlugins = new PluginManager(Level.CATEGORY); levelPlugins.collectPlugins(pluginPackages); final Map<String, PluginType<?>> plugins = levelPlugins.getPlugins(); if (plugins != null) { for (final PluginType<?> type : plugins.values()) { try { // Cause the class to be initialized if it isn’t already. Loader.initializeClass(type.getPluginClass().getName(), type.getPluginClass().getClassLoader()); } catch (final Exception e) { LOGGER.error(“Unable to initialize {} due to {}”, type.getPluginClass().getName(), e.getClass() .getSimpleName(), e); } } } setup(); setupAdvertisement(); doConfigure(); final Set<LoggerConfig> alreadyStarted = new HashSet<LoggerConfig>(); for (final LoggerConfig logger : loggers.values()) { logger.start(); alreadyStarted.add(logger); } for (final Appender appender : appenders.values()) { appender.start(); } if (!alreadyStarted.contains(root)) { // LOG4J2-392 root.start(); // LOG4J2-336 } super.start(); LOGGER.debug(“Started configuration {} OK.”, this); }这里面有如下步骤:
获取日志等级的插件初始化初始化Advertiser配置先看一下初始化,也就是setup这个方法,setup是一个需要被复写的方法,我们以XMLConfiguration作为例子,
@Override public void setup() { if (rootElement == null) { LOGGER.error(“No logging configuration”); return; } constructHierarchy(rootNode, rootElement); if (status.size() > 0) { for (final Status s : status) { LOGGER.error(“Error processing element {}: {}”, s.name, s.errorType); } return; } rootElement = null; }发现这里面有一个比较重要的方法constructHierarchy,跟进:
private void constructHierarchy(final Node node, final Element element) { processAttributes(node, element); final StringBuilder buffer = new StringBuilder(); final NodeList list = element.getChildNodes(); final List<Node> children = node.getChildren(); for (int i = 0; i < list.getLength(); i++) { final org.w3c.dom.Node w3cNode = list.item(i); if (w3cNode instanceof Element) { final Element child = (Element) w3cNode; final String name = getType(child); final PluginType<?> type = pluginManager.getPluginType(name); final Node childNode = new Node(node, name, type); constructHierarchy(childNode, child); if (type == null) { final String value = childNode.getValue(); if (!childNode.hasChildren() && value != null) { node.getAttributes().put(name, value); } else { status.add(new Status(name, element, ErrorType.CLASS_NOT_FOUND)); } } else { children.add(childNode); } } else if (w3cNode instanceof Text) { final Text data = (Text) w3cNode; buffer.append(data.getData()); } } final String text = buffer.toString().trim(); if (text.length() > 0 || (!node.hasChildren() && !node.isRoot())) { node.setValue(text); } }发现这个就是一个树遍历的过程。诚然,配置文件是以xml的形式给出的,xml的结构就是一个树形结构。回到start方法,跟进doConfiguration:
protected void doConfigure() { if (rootNode.hasChildren() && rootNode.getChildren().get(0).getName().equalsIgnoreCase(“Properties”)) { final Node first = rootNode.getChildren().get(0); createConfiguration(first, null); if (first.getObject() != null) { subst.setVariableResolver((StrLookup) first.getObject()); } } else { final Map<String, String> map = this.getComponent(CONTEXT_PROPERTIES); final StrLookup lookup = map == null ? null : new MapLookup(map); subst.setVariableResolver(new Interpolator(lookup, pluginPackages)); } boolean setLoggers = false; boolean setRoot = false; for (final Node child : rootNode.getChildren()) { if (child.getName().equalsIgnoreCase(“Properties”)) { if (tempLookup == subst.getVariableResolver()) { LOGGER.error(“Properties declaration must be the first element in the configuration”); } continue; } createConfiguration(child, null); if (child.getObject() == null) { continue; } if (child.getName().equalsIgnoreCase(“Appenders”)) { appenders = child.getObject(); } else if (child.isInstanceOf(Filter.class)) { addFilter(child.getObject(Filter.class)); } else if (child.getName().equalsIgnoreCase(“Loggers”)) { final Loggers l = child.getObject(); loggers = l.getMap(); setLoggers = true; if (l.getRoot() != null) { root = l.getRoot(); setRoot = true; } } else if (child.getName().equalsIgnoreCase(“CustomLevels”)) { customLevels = child.getObject(CustomLevels.class).getCustomLevels(); } else if (child.isInstanceOf(CustomLevelConfig.class)) { final List<CustomLevelConfig> copy = new ArrayList<CustomLevelConfig>(customLevels); copy.add(child.getObject(CustomLevelConfig.class)); customLevels = copy; } else { LOGGER.error(“Unknown object \”{}\” of type {} is ignored.”, child.getName(), child.getObject().getClass().getName()); } } if (!setLoggers) { LOGGER.warn(“No Loggers were configured, using default. Is the Loggers element missing?”); setToDefault(); return; } else if (!setRoot) { LOGGER.warn(“No Root logger was configured, creating default ERROR-level Root logger with Console appender”); setToDefault(); // return; // LOG4J2-219: creating default root=ok, but don’t exclude configured Loggers } for (final Map.Entry<String, LoggerConfig> entry : loggers.entrySet()) { final LoggerConfig l = entry.getValue(); for (final AppenderRef ref : l.getAppenderRefs()) { final Appender app = appenders.get(ref.getRef()); if (app != null) { l.addAppender(app, ref.getLevel(), ref.getFilter()); } else { LOGGER.error(“Unable to locate appender {} for logger {}”, ref.getRef(), l.getName()); } } } setParents(); }发现就是对刚刚获取的configuration进行解析,然后塞进正确的地方。回到start方法,可以看到昨晚配置之后就是开启logger和appender了。
异步
AsyncAppender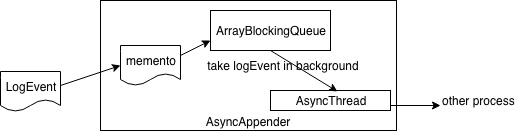
log4j2突出于其他日志的优势,异步日志实现。我们先从日志打印看进去。找到Logger,随便找一个log日志的方法。
public void debug(final Marker marker, final Message msg) { logIfEnabled(FQCN, Level.DEBUG, marker, msg, msg != null ? msg.getThrowable() : null); }一路跟进
@PerformanceSensitive // NOTE: This is a hot method. Current implementation compiles to 29 bytes of byte code. // This is within the 35 byte MaxInlineSize threshold. Modify with care! private void logMessageTrackRecursion(final String fqcn, final Level level, final Marker marker, final Message msg, final Throwable throwable) { try { incrementRecursionDepth(); // LOG4J2-1518, LOG4J2-2031 tryLogMessage(fqcn, level, marker, msg, throwable); } finally { decrementRecursionDepth(); } }可以看出这个在打日志之前做了调用次数的记录。跟进tryLogMessage,
@PerformanceSensitive // NOTE: This is a hot method. Current implementation compiles to 26 bytes of byte code. // This is within the 35 byte MaxInlineSize threshold. Modify with care! private void tryLogMessage(final String fqcn, final Level level, final Marker marker, final Message msg, final Throwable throwable) { try { logMessage(fqcn, level, marker, msg, throwable); } catch (final Exception e) { // LOG4J2-1990 Log4j2 suppresses all exceptions that occur once application called the logger handleLogMessageException(e, fqcn, msg); } }继续跟进:
@Override public void logMessage(final String fqcn, final Level level, final Marker marker, final Message message, final Throwable t) { final Message msg = message == null ? new SimpleMessage(Strings.EMPTY) : message; final ReliabilityStrategy strategy = privateConfig.loggerConfig.getReliabilityStrategy(); strategy.log(this, getName(), fqcn, marker, level, msg, t); }这里可以看到在实际打日志的时候,会从config中获取打日志的策略,跟踪ReliabilityStrategy的创建,发现默认的实现类为DefaultReliabilityStrategy,跟进看实际打日志的方法
@Override public void log(final Supplier<LoggerConfig> reconfigured, final String loggerName, final String fqcn, final Marker marker, final Level level, final Message data, final Throwable t) { loggerConfig.log(loggerName, fqcn, marker, level, data, t); }这里实际打日志的方法居然是交给一个config去实现的。。。感觉有点奇怪。。跟进看看
@PerformanceSensitive(“allocation”) public void log(final String loggerName, final String fqcn, final Marker marker, final Level level, final Message data, final Throwable t) { List<Property> props = null; if (!propertiesRequireLookup) { props = properties; } else { if (properties != null) { props = new ArrayList<>(properties.size()); final LogEvent event = Log4jLogEvent.newBuilder() .setMessage(data) .setMarker(marker) .setLevel(level) .setLoggerName(loggerName) .setLoggerFqcn(fqcn) .setThrown(t) .build(); for (int i = 0; i < properties.size(); i++) { final Property prop = properties.get(i); final String value = prop.isValueNeedsLookup() // since LOG4J2-1575 ? config.getStrSubstitutor().replace(event, prop.getValue()) // : prop.getValue(); props.add(Property.createProperty(prop.getName(), value)); } } } final LogEvent logEvent = logEventFactory.createEvent(loggerName, marker, fqcn, level, data, props, t); try { log(logEvent, LoggerConfigPredicate.ALL); } finally { // LOG4J2-1583 prevent scrambled logs when logging calls are nested (logging in toString()) ReusableLogEventFactory.release(logEvent); } }可以清楚的看到try之前是在创建LogEvent,try里面做的才是真正的log(好tm累),一路跟进。
private void processLogEvent(final LogEvent event, LoggerConfigPredicate predicate) { event.setIncludeLocation(isIncludeLocation()); if (predicate.allow(this)) { callAppenders(event); } logParent(event, predicate); }接下来就是callAppender了,我们直接开始看AsyncAppender的append方法:
/** * Actual writing occurs here. * * @param logEvent The LogEvent. */ @Override public void append(final LogEvent logEvent) { if (!isStarted()) { throw new IllegalStateException(“AsyncAppender ” + getName() + ” is not active”); } final Log4jLogEvent memento = Log4jLogEvent.createMemento(logEvent, includeLocation); InternalAsyncUtil.makeMessageImmutable(logEvent.getMessage()); if (!transfer(memento)) { if (blocking) { if (AbstractLogger.getRecursionDepth() > 1) { // LOG4J2-1518, LOG4J2-2031 // If queue is full AND we are in a recursive call, call appender directly to prevent deadlock AsyncQueueFullMessageUtil.logWarningToStatusLogger(); logMessageInCurrentThread(logEvent); } else { // delegate to the event router (which may discard, enqueue and block, or log in current thread) final EventRoute route = asyncQueueFullPolicy.getRoute(thread.getId(), memento.getLevel()); route.logMessage(this, memento); } } else { error(“Appender ” + getName() + ” is unable to write primary appenders. queue is full”); logToErrorAppenderIfNecessary(false, memento); } } }这里主要的步骤就是:
生成logEvent将logEvent放入BlockingQueue,就是transfer方法如果BlockingQueue满了则启用相应的策略同样的,这里也有一个线程用来做异步消费的事情
private class AsyncThread extends Log4jThread { private volatile boolean shutdown = false; private final List<AppenderControl> appenders; private final BlockingQueue<LogEvent> queue; public AsyncThread(final List<AppenderControl> appenders, final BlockingQueue<LogEvent> queue) { super(“AsyncAppender-” + THREAD_SEQUENCE.getAndIncrement()); this.appenders = appenders; this.queue = queue; setDaemon(true); } @Override public void run() { while (!shutdown) { LogEvent event; try { event = queue.take(); if (event == SHUTDOWN_LOG_EVENT) { shutdown = true; continue; } } catch (final InterruptedException ex) { break; // LOG4J2-830 } event.setEndOfBatch(queue.isEmpty()); final boolean success = callAppenders(event); if (!success && errorAppender != null) { try { errorAppender.callAppender(event); } catch (final Exception ex) { // Silently accept the error. } } } // Process any remaining items in the queue. LOGGER.trace(“AsyncAppender.AsyncThread shutting down. Processing remaining {} queue events.”, queue.size()); int count = 0; int ignored = 0; while (!queue.isEmpty()) { try { final LogEvent event = queue.take(); if (event instanceof Log4jLogEvent) { final Log4jLogEvent logEvent = (Log4jLogEvent) event; logEvent.setEndOfBatch(queue.isEmpty()); callAppenders(logEvent); count++; } else { ignored++; LOGGER.trace(“Ignoring event of class {}”, event.getClass().getName()); } } catch (final InterruptedException ex) { // May have been interrupted to shut down. // Here we ignore interrupts and try to process all remaining events. } } LOGGER.trace(“AsyncAppender.AsyncThread stopped. Queue has {} events remaining. ” + “Processed {} and ignored {} events since shutdown started.”, queue.size(), count, ignored); } /** * Calls {@link AppenderControl#callAppender(LogEvent) callAppender} on all registered {@code AppenderControl} * objects, and returns {@code true} if at least one appender call was successful, {@code false} otherwise. Any * exceptions are silently ignored. * * @param event the event to forward to the registered appenders * @return {@code true} if at least one appender call succeeded, {@code false} otherwise */ boolean callAppenders(final LogEvent event) { boolean success = false; for (final AppenderControl control : appenders) { try { control.callAppender(event); success = true; } catch (final Exception ex) { // If no appender is successful the error appender will get it. } } return success; } public void shutdown() { shutdown = true; if (queue.isEmpty()) { queue.offer(SHUTDOWN_LOG_EVENT); } if (getState() == State.TIMED_WAITING || getState() == State.WAITING) { this.interrupt(); // LOG4J2-1422: if underlying appender is stuck in wait/sleep/join/park call } } }直接看run方法:
阻塞获取logEvent将logEvent分发出去如果线程要退出了,将blockingQueue里面的event消费完在退出。AsyncLogger
直接从AsyncLogger的logMessage看进去:
public void logMessage(final String fqcn, final Level level, final Marker marker, final Message message, final Throwable thrown) { if (loggerDisruptor.isUseThreadLocals()) { logWithThreadLocalTranslator(fqcn, level, marker, message, thrown); } else { // LOG4J2-1172: avoid storing non-JDK classes in ThreadLocals to avoid memory leaks in web apps logWithVarargTranslator(fqcn, level, marker, message, thrown); } }跟进logWithThreadLocalTranslator,
private void logWithThreadLocalTranslator(final String fqcn, final Level level, final Marker marker, final Message message, final Throwable thrown) { // Implementation note: this method is tuned for performance. MODIFY WITH CARE! final RingBufferLogEventTranslator translator = getCachedTranslator(); initTranslator(translator, fqcn, level, marker, message, thrown); initTranslatorThreadValues(translator); publish(translator); }这里的逻辑很简单,就是将日志相关的信息转换成RingBufferLogEvent(RingBuffer是Disruptor的无所队列),然后将其发布到RingBuffer中。发布到RingBuffer中,那肯定也有消费逻辑。这时候有两种方式可以找到这个消费的逻辑。
找disruptor被使用的地方,然后查看,但是这样做会很容易迷惑按照Log4j2的尿性,这种Logger都有对应的start方法,我们可以从start方法入手寻找在start方法中,我们找到了一段代码:
final RingBufferLogEventHandler[] handlers = {new RingBufferLogEventHandler()}; disruptor.handleEventsWith(handlers);直接看看这个RingBufferLogEventHandler的实现:
public class RingBufferLogEventHandler implements SequenceReportingEventHandler<RingBufferLogEvent>, LifecycleAware { private static final int NOTIFY_PROGRESS_THRESHOLD = 50; private Sequence sequenceCallback; private int counter; private long threadId = -1; @Override public void setSequenceCallback(final Sequence sequenceCallback) { this.sequenceCallback = sequenceCallback; } @Override public void onEvent(final RingBufferLogEvent event, final long sequence, final boolean endOfBatch) throws Exception { event.execute(endOfBatch); event.clear(); // notify the BatchEventProcessor that the sequence has progressed. // Without this callback the sequence would not be progressed // until the batch has completely finished. if (++counter > NOTIFY_PROGRESS_THRESHOLD) { sequenceCallback.set(sequence); counter = 0; } } /** * Returns the thread ID of the background consumer thread, or {@code -1} if the background thread has not started * yet. * @return the thread ID of the background consumer thread, or {@code -1} */ public long getThreadId() { return threadId; } @Override public void onStart() { threadId = Thread.currentThread().getId(); } @Override public void onShutdown() { }}顺着接口找上去,发现一个接口:
/** * Callback interface to be implemented for processing events as they become available in the {@link RingBuffer} * * @param <T> event implementation storing the data for sharing during exchange or parallel coordination of an event. * @see BatchEventProcessor#setExceptionHandler(ExceptionHandler) if you want to handle exceptions propagated out of the handler. */public interface EventHandler<T>{ /** * Called when a publisher has published an event to the {@link RingBuffer} * * @param event published to the {@link RingBuffer} * @param sequence of the event being processed * @param endOfBatch flag to indicate if this is the last event in a batch from the {@link RingBuffer} * @throws Exception if the EventHandler would like the exception handled further up the chain. */ void onEvent(T event, long sequence, boolean endOfBatch) throws Exception;}通过注释可以发现,这个onEvent就是处理逻辑,回到RingBufferLogEventHandler的onEvent方法,发现里面有一个execute方法,跟进:
public void execute(final boolean endOfBatch) { this.endOfBatch = endOfBatch; asyncLogger.actualAsyncLog(this); }这个方法就是实际打日志了,AsyncLogger看起来还是比较简单的,只是使用了一个Disruptor。
插件化
之前在很多代码里面都可以看到
final PluginManager manager = new PluginManager(CATEGORY);manager.collectPlugins(pluginPackages);其实整个log4j2为了获得更好的扩展性,将自己的很多组件都做成了插件,然后在配置的时候去加载plugin。
跟进collectPlugins。
public void collectPlugins(final List<String> packages) { final String categoryLowerCase = category.toLowerCase(); final Map<String, PluginType<?>> newPlugins = new LinkedHashMap<>(); // First, iterate the Log4j2Plugin.dat files found in the main CLASSPATH Map<String, List<PluginType<?>>> builtInPlugins = PluginRegistry.getInstance().loadFromMainClassLoader(); if (builtInPlugins.isEmpty()) { // If we didn’t find any plugins above, someone must have messed with the log4j-core.jar. // Search the standard package in the hopes we can find our core plugins. builtInPlugins = PluginRegistry.getInstance().loadFromPackage(LOG4J_PACKAGES); } mergeByName(newPlugins, builtInPlugins.get(categoryLowerCase)); // Next, iterate any Log4j2Plugin.dat files from OSGi Bundles for (final Map<String, List<PluginType<?>>> pluginsByCategory : PluginRegistry.getInstance().getPluginsByCategoryByBundleId().values()) { mergeByName(newPlugins, pluginsByCategory.get(categoryLowerCase)); } // Next iterate any packages passed to the static addPackage method. for (final String pkg : PACKAGES) { mergeByName(newPlugins, PluginRegistry.getInstance().loadFromPackage(pkg).get(categoryLowerCase)); } // Finally iterate any packages provided in the configuration (note these can be changed at runtime). if (packages != null) { for (final String pkg : packages) { mergeByName(newPlugins, PluginRegistry.getInstance().loadFromPackage(pkg).get(categoryLowerCase)); } } LOGGER.debug(“PluginManager ‘{}’ found {} plugins”, category, newPlugins.size()); plugins = newPlugins; }处理逻辑如下:
从Log4j2Plugin.dat中加载所有的内置的plugin然后将OSGi Bundles中的Log4j2Plugin.dat中的plugin加载进来再加载传入的package路径中的plugin最后加载配置中的plugin逻辑还是比较简单的,但是我在看源码的时候发现了一个很有意思的东西,就是在加载log4j2 core插件的时候,也就是
PluginRegistry.getInstance().loadFromMainClassLoader()这个方法,跟进到decodeCacheFiles:
private Map<String, List<PluginType<?>>> decodeCacheFiles(final ClassLoader loader) { final long startTime = System.nanoTime(); final PluginCache cache = new PluginCache(); try { final Enumeration<URL> resources = loader.getResources(PluginProcessor.PLUGIN_CACHE_FILE); if (resources == null) { LOGGER.info(“Plugin preloads not available from class loader {}”, loader); } else { cache.loadCacheFiles(resources); } } catch (final IOException ioe) { LOGGER.warn(“Unable to preload plugins”, ioe); } final Map<String, List<PluginType<?>>> newPluginsByCategory = new HashMap<>(); int pluginCount = 0; for (final Map.Entry<String, Map<String, PluginEntry>> outer : cache.getAllCategories().entrySet()) { final String categoryLowerCase = outer.getKey(); final List<PluginType<?>> types = new ArrayList<>(outer.getValue().size()); newPluginsByCategory.put(categoryLowerCase, types); for (final Map.Entry<String, PluginEntry> inner : outer.getValue().entrySet()) { final PluginEntry entry = inner.getValue(); final String className = entry.getClassName(); try { final Class<?> clazz = loader.loadClass(className); final PluginType<?> type = new PluginType<>(entry, clazz, entry.getName()); types.add(type); ++pluginCount; } catch (final ClassNotFoundException e) { LOGGER.info(“Plugin [{}] could not be loaded due to missing classes.”, className, e); } catch (final LinkageError e) { LOGGER.info(“Plugin [{}] could not be loaded due to linkage error.”, className, e); } } } final long endTime = System.nanoTime(); final DecimalFormat numFormat = new DecimalFormat(“#0.000000”); final double seconds = (endTime – startTime) * 1e-9; LOGGER.debug(“Took {} seconds to load {} plugins from {}”, numFormat.format(seconds), pluginCount, loader); return newPluginsByCategory; }可以发现加载时候是从一个文件(PLUGIN_CACHE_FILE)获取所有要获取的plugin。看到这里的时候我有一个疑惑就是,为什么不用反射的方式直接去扫描,而是要从文件中加载进来,而且文件是写死的,很不容易扩展啊。然后我找了一下PLUGIN_CACHE_FILE这个静态变量的用处,发现了PluginProcessor这个类,这里用到了注解处理器。
/** * Annotation processor for pre-scanning Log4j 2 plugins. */@SupportedAnnotationTypes(“org.apache.logging.log4j.core.config.plugins.*”)public class PluginProcessor extends AbstractProcessor { // TODO: this could be made more abstract to allow for compile-time and run-time plugin processing /** * The location of the plugin cache data file. This file is written to by this processor, and read from by * {@link org.apache.logging.log4j.core.config.plugins.util.PluginManager}. */ public static final String PLUGIN_CACHE_FILE = “META-INF/org/apache/logging/log4j/core/config/plugins/Log4j2Plugins.dat”; private final PluginCache pluginCache = new PluginCache(); @Override public boolean process(final Set<? extends TypeElement> annotations, final RoundEnvironment roundEnv) { System.out.println(“Processing annotations”); try { final Set<? extends Element> elements = roundEnv.getElementsAnnotatedWith(Plugin.class); if (elements.isEmpty()) { System.out.println(“No elements to process”); return false; } collectPlugins(elements); writeCacheFile(elements.toArray(new Element[elements.size()])); System.out.println(“Annotations processed”); return true; } catch (final IOException e) { e.printStackTrace(); error(e.getMessage()); return false; } catch (final Exception ex) { ex.printStackTrace(); error(ex.getMessage()); return false; } }}(不太重要的方法省略)
我们可以看到在process方法中,PluginProcessor会先收集所有的Plugin,然后在写入文件。这样做的好处就是可以省去反射时候的开销。
然后我又看了一下Plugin这个注解,发现它的RetentionPolicy是RUNTIME,一般来说PluginProcessor是搭配RetentionPolicy.SOURCE,CLASS使用的,而且既然你把自己的Plugin扫描之后写在文件中了,RetentionPolicy就没有必要是RUNTIME了吧,这个是一个很奇怪的地方。
小结
总算是把Log4j2的代码看完了,发现它的设计理念很值得借鉴,为了灵活性,所有的东西都设计成插件式。互联网技术日益发展,各种中间件层出不穷,而作为工程师的我们更需要做的是去思考代码与代码之间的关系,毫无疑问的是,解耦是最具有美感的关系。
作者:netflix
原创文章,作者:小条,如若转载,请注明出处:https://www.sudun.com/ask/83802.html
