
/01/ 剪贴板管理器
你是否曾发现自己忙于处理多个文本片段,而忘记了自己复制了什么?有没有想过有一个工具可以记录你一天中复制的所有内容?
这个自动化脚本可以监控你复制的所有内容,将复制的每个文本无缝地存储在一个时尚的图形界面中,这样你就不必在无尽的标签页中搜索,也不会丢失一些有价值的信息。
该自动化脚本利用Pyperclip库的强大功能无缝捕获复制数据,并集成了Tkinter以可视化方式跟踪和管理复制的文本。
import tkinter as tk
from tkinter import ttk
import pyperclip
def update_listbox():
new_item = pyperclip.paste()
if new_item not in X:
X.append(new_item)
listbox.insert(tk.END, new_item)
listbox.insert(tk.END, “———————-“)
listbox.yview(tk.END)
root.after(1000, update_listbox)
def copy_to_clipboard(event):
selected_item = listbox.get(listbox.curselection())
if selected_item:
pyperclip.copy(selected_item)
X = []
root = tk.Tk()
root.title(“Clipboard Manager”)
root.geometry(“500×500”)
root.configure(bg=“#f0f0f0”)
frame = tk.Frame(root, bg=“#f0f0f0”)
frame.pack(padx=10, pady=10)
label = tk.Label(frame, text=“Clipboard Contents:”, bg=“#f0f0f0”)
label.grid(row=0, column=0)
scrollbar = tk.Scrollbar(root)
scrollbar.pack(side=tk.RIGHT, fill=tk.Y)
listbox = tk.Listbox(root, width=150, height=150, yscrollcommand=scrollbar.set)
listbox.pack(pady=10)
scrollbar.config(command=listbox.yview)
update_listbox()
listbox.bind(“<Double-Button-1>”, copy_to_clipboard)
root.mainloop()
应用
-
捕捉从各种来源复制的研究笔记并进行分类。 -
扩展脚本可以捕捉重要的日历事件、提醒事项、密码等。
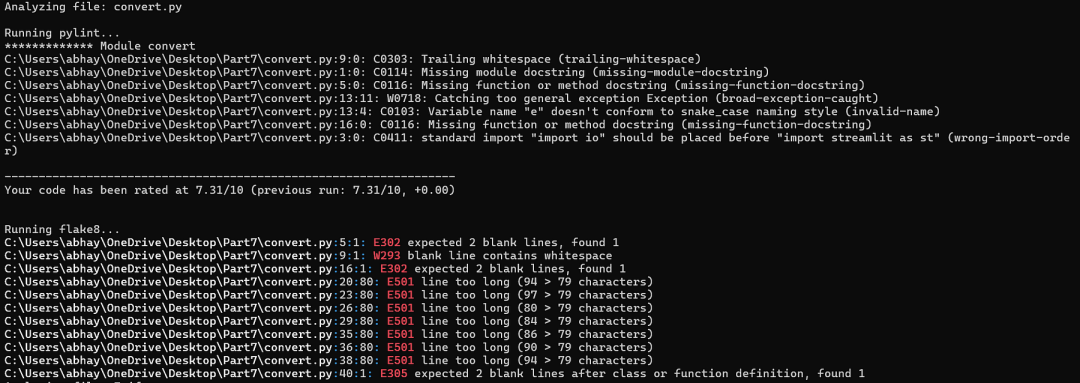
每个开发人员都会遇到这样的挫折:在 Python 代码中查找错误,却发现自己迷失在错误的迷宫中。作为开发人员,我们深知编写简洁高效代码的重要性,但手动分析代码质量可能是一项压力巨大的任务。
本自动化脚本利用 Pylint 和 Flake8 Python 软件包对代码质量进行全面审查。将你的代码与编码标准进行比较,并找出逻辑错误。它可确保的代码符合行业最佳实践并保持无错。
import os
import subprocess
def analyze_code(directory):
# List Python files in the directory
python_files = [file for file in os.listdir(directory) if file.endswith(‘.py’)]
if not python_files:
print(“No Python files found in the specified directory.”)
return
# Analyze each Python file using pylint and flake8
for file in python_files:
print(f”Analyzing file: {file}“)
file_path = os.path.join(directory, file)
# Run pylint
print(“nRunning pylint…”)
pylint_command = f”pylint {file_path}“
subprocess.run(pylint_command, shell=True)
# Run flake8
print(“nRunning flake8…”)
flake8_command = f”flake8 {file_path}“
subprocess.run(flake8_command, shell=True)
if __name__ == “__main__”:
directory = r”C:UsersabhayOneDriveDesktopPart7″
analyze_code(directory)
应用
-
自动代码增强器 – 对该脚本稍作扩展,可用于创建一个 Python 脚本,用于识别代码中的问题并作出相应修改。 -
自动代码审查。
文件篡改又称数据篡改,是指未经授权故意更改信息,包括破坏、篡改或编辑数据。
全球许多威胁行为者滥用文件篡改技术,在关键系统文件中引入不同的漏洞或后门,从而危及安全性并使未经授权的访问成为可能。
要降低这种风险,关键是要验证文件的完整性,确保它们与原始状态保持一致。这个自动化脚本可以帮助你测试任何文件,并识别其是否被篡改。
import hashlib
import os
def calculate_sha256(file_path):
sha256 = hashlib.sha256()
with open(file_path, ‘rb’) as file:
for chunk in iter(lambda: file.read(4096), b”):
sha256.update(chunk)
return sha256.hexdigest()
def check_integrity(file_path, expected_checksum):
actual_checksum = calculate_sha256(file_path)
return actual_checksum == expected_checksum
if __name__ == “__main__”:
file_path = input(“Enter the path to the file: “)
expected_checksum = input(“Enter the expected SHA-256 checksum: “)
if os.path.isfile(file_path):
if check_integrity(file_path, expected_checksum):
print(“File integrity verified: The file has not been tampered with.”)
else:
print(“File integrity check failed: The file may have been tampered with.”)
else:
print(“Error: File not found.”)


/04/ 智能交易
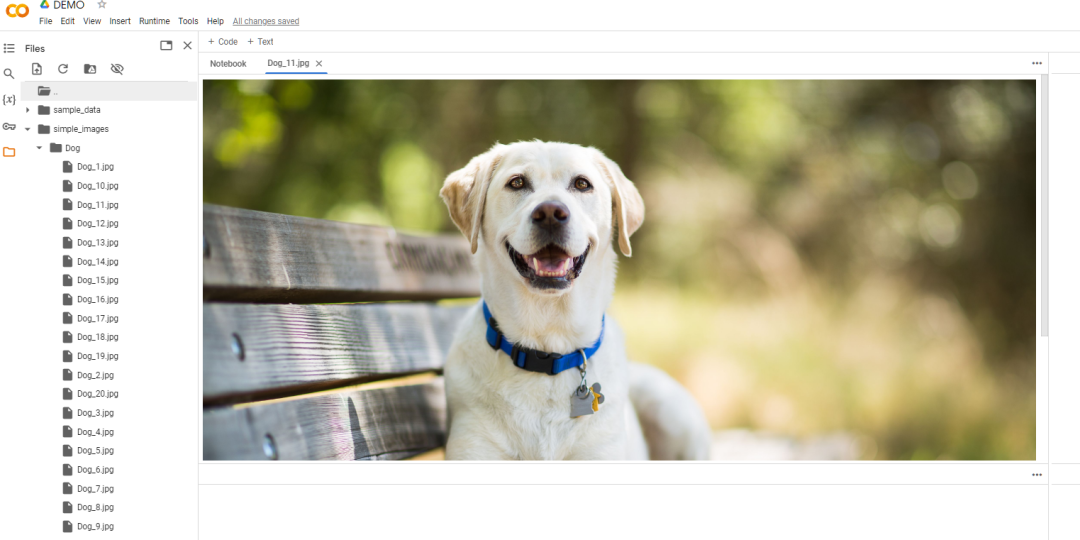
交易是指买卖股票、债券、货币、商品或衍生品等金融工具,以获取利润。期刊交易员整天都在查看不同的仪表盘,试图找出买入或卖出的完美决策。
这个自动化脚本可以帮助交易者和投资者很好地了解你愿意投资的任何股票。它利用*****Prophet* Python 库,根据从雅虎财经获取的历史股票数据预测近期股票价格。
import streamlit as st
from datetime import date
import yfinance as yf
from prophet import Prophet
from prophet.plot import plot_plotly
from plotly import graph_objs as go
START = “2015-01-01”
TODAY = date.today().strftime(“%Y-%m-%d”)
st.title(‘Stock Forecast App’)
stocks = (‘MSFT’,“TSLA”,‘GOOG’, ‘AAPL’, “NVDA”)
selected_stock = st.selectbox(‘Select dataset for prediction’, stocks)
n_years = st.slider(‘Years of prediction:’, 1, 4)
period = n_years * 365
@st.cache
def load_data(ticker):
data = yf.download(ticker, START, TODAY)
data.reset_index(inplace=True)
return data
data_load_state = st.text(‘Loading data…’)
data = load_data(selected_stock)
data_load_state.text(‘Loading data… done!’)
st.subheader(‘Raw data’)
st.write(data.tail())
# Plot raw data
def plot_raw_data():
fig = go.Figure()
fig.add_trace(go.Scatter(x=data[‘Date’], y=data[‘Open’], name=“stock_open”))
fig.add_trace(go.Scatter(x=data[‘Date’], y=data[‘Close’], name=“stock_close”))
fig.layout.update(title_text=‘Time Series data with Rangeslider’, xaxis_rangeslider_visible=True)
st.plotly_chart(fig)
plot_raw_data()
# Predict forecast with Prophet.
df_train = data[[‘Date’,‘Close’]]
df_train = df_train.rename(columns={“Date”: “ds”, “Close”: “y”})
m = Prophet()
m.fit(df_train)
future = m.make_future_dataframe(periods=period)
forecast = m.predict(future)
# Show and plot forecast
st.subheader(‘Forecast data’)
st.write(forecast.tail())
st.write(f’Forecast plot for {n_years} years’)
fig1 = plot_plotly(m, forecast)
st.plotly_chart(fig1)
st.write(“Forecast components”)
fig2 = m.plot_components(forecast)
st.write(fig2)
要运行此程序,首先需要使用 pip 安装 Streamlit、yfinance、prophet 和 plotly python 库。
pip install streamlit prophet yfinance plotly
然后使用命令streamlit run smart_trade.py 运行它
应用
-
算法交易 -
股票价格比较仪表板
/05/ 自动图像下载器
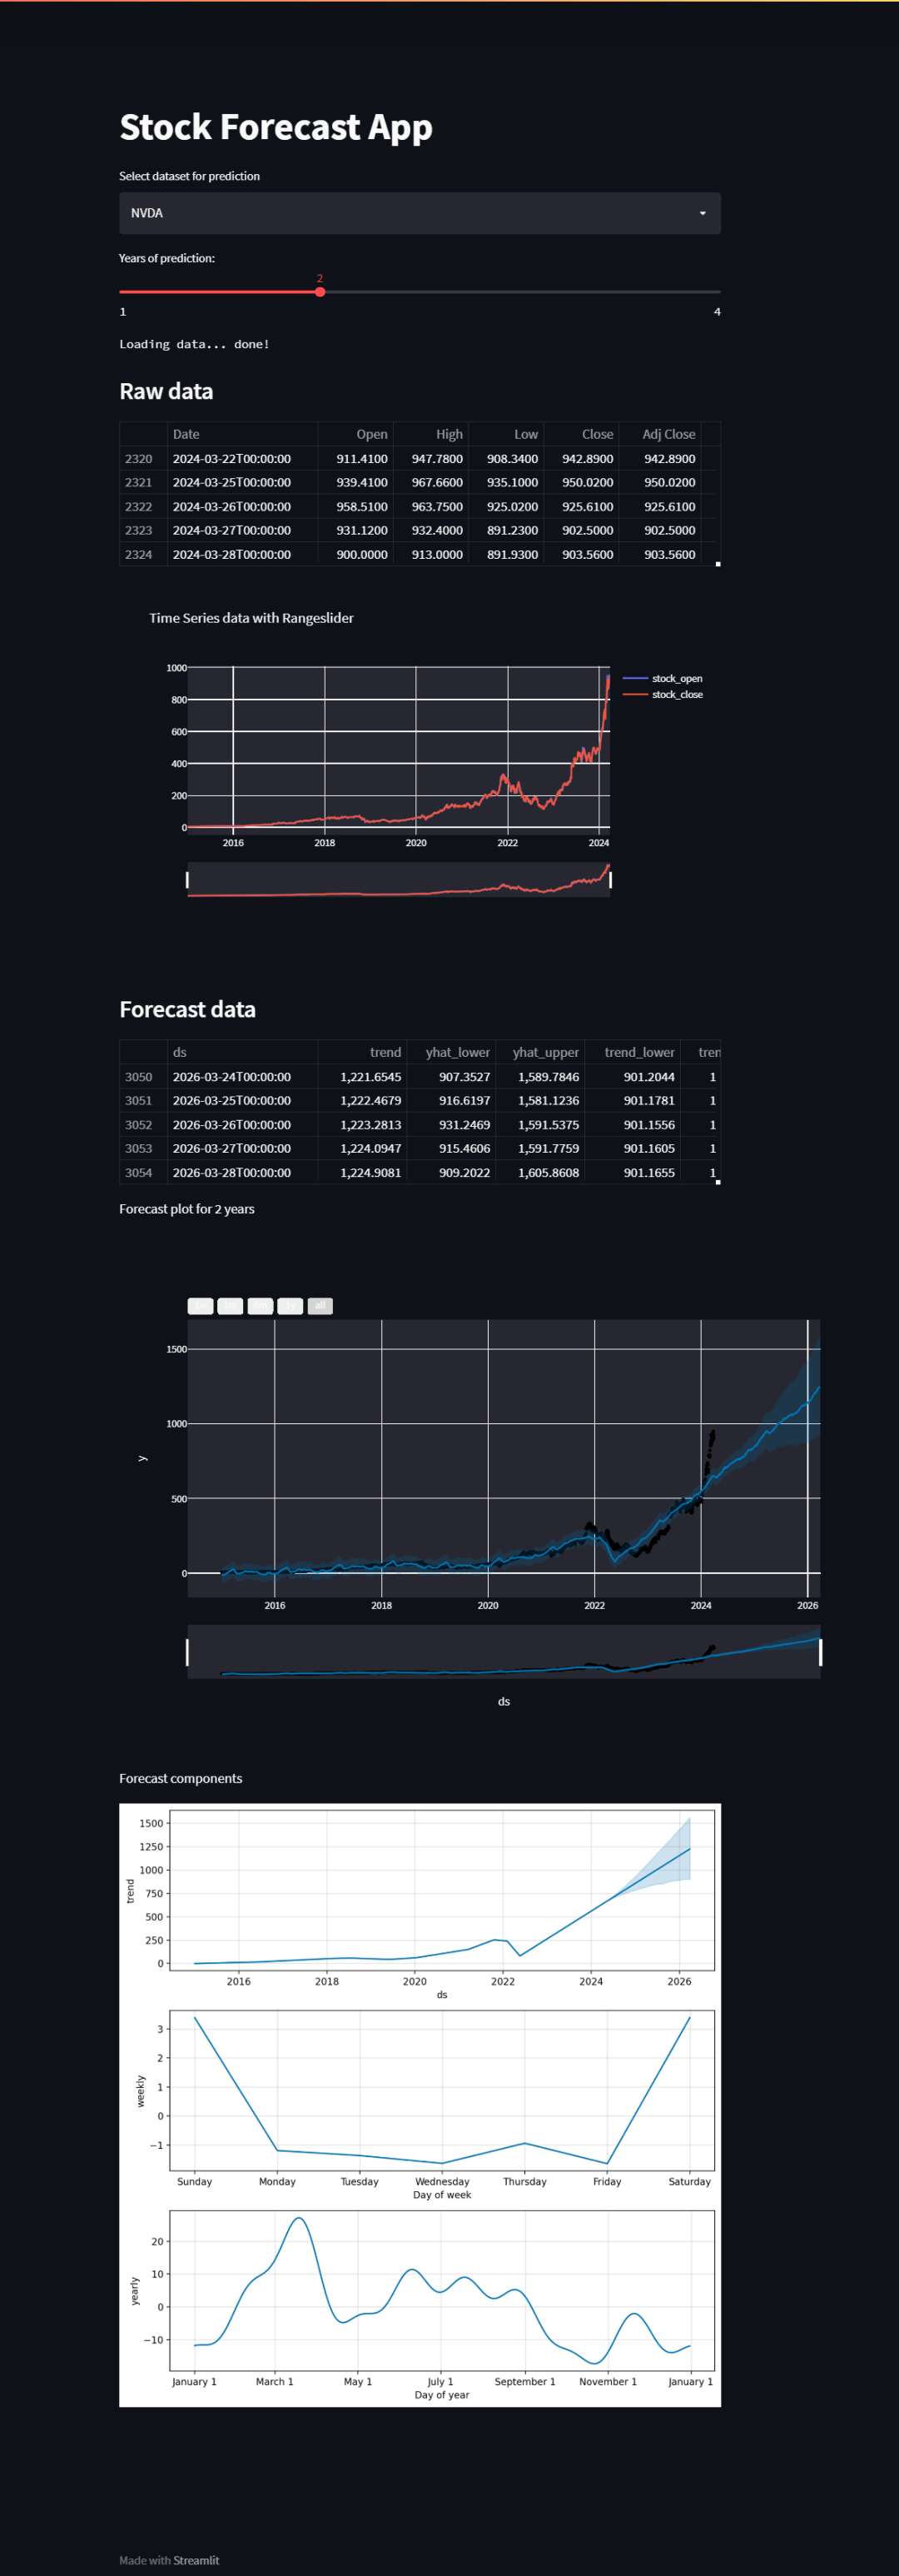
收集图像数据是计算机视觉项目的关键挑战。正如 Andrew Ng 所说,如果你能收集到大量数据集,那么算法就不重要了。数据对提高模型的性能和准确性起着关键作用。

只需几行代码,这个自动化脚本就能帮助你在几分钟内从网上下载数据。
# Importing the necessary module and function
from simple_image_download import simple_image_download as simp
# Creating a response object
response = simp.simple_image_download
## Keyword
keyword = “Dog”
# Downloading images
try:
response().download(keyword, 20)
print(“Images downloaded successfully.”)
except Exception as e:
print(“An error occurred:”, e)
/06/ 端口扫描程序
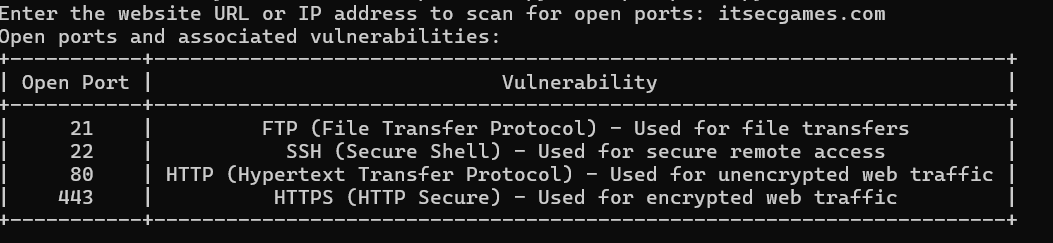
在计算机网络中,端口是允许不同进程或服务通过网络连接和交换数据的通信端点。端口由数值标识,并与特定协议相关联。
开放端口就像建筑物中的门窗,每个端口都是网站与外部网络通信的潜在入口。然而,在没有采取适当安全措施的情况下开放端口,会使网站容易受到网络攻击。
这个自动化脚本会将网站 URL 作为输入,并检查该网站是否存在任何开放端口。无论你是作为 “红队 “的一员在执行任务,还是在 “蓝队 “中坚守阵地,这个脚本都能为你提供有用的便利工具。
import socket
from prettytable import PrettyTable
# Dictionary mapping common ports to vulnerabilities (Top 15)
vulnerabilities = {
80: “HTTP (Hypertext Transfer Protocol) – Used for unencrypted web traffic”,
443: “HTTPS (HTTP Secure) – Used for encrypted web traffic”,
22: “SSH (Secure Shell) – Used for secure remote access”,
21: “FTP (File Transfer Protocol) – Used for file transfers”,
25: “SMTP (Simple Mail Transfer Protocol) – Used for email transmission”,
23: “Telnet – Used for remote terminal access”,
53: “DNS (Domain Name System) – Used for domain name resolution”,
110: “POP3 (Post Office Protocol version 3) – Used for email retrieval”,
143: “IMAP (Internet Message Access Protocol) – Used for email retrieval”,
3306: “MySQL – Used for MySQL database access”,
3389: “RDP (Remote Desktop Protocol) – Used for remote desktop connections (Windows)”,
8080: “HTTP Alternate – Commonly used as a secondary HTTP port”,
8000: “HTTP Alternate – Commonly used as a secondary HTTP port”,
8443: “HTTPS Alternate – Commonly used as a secondary HTTPS port”,
5900: “VNC (Virtual Network Computing) – Used for remote desktop access”,
# Add more ports and vulnerabilities as needed
}
def display_table(open_ports):
table = PrettyTable([“Open Port”, “Vulnerability”])
for port in open_ports:
vulnerability = vulnerabilities.get(port, “No known vulnerabilities associated with common services”)
table.add_row([port, vulnerability])
print(table)
def scan_top_ports(target):
open_ports = []
top_ports = [21, 22, 23, 25, 53, 80, 110, 143, 443, 3306, 3389, 5900, 8000, 8080, 8443] # Top 15 ports
for port in top_ports:
try:
sock = socket.socket(socket.AF_INET, socket.SOCK_STREAM)
sock.settimeout(1) # Adjust timeout as needed
result = sock.connect_ex((target, port))
if result == 0:
open_ports.append(port)
sock.close()
except KeyboardInterrupt:
sys.exit()
except socket.error:
pass
return open_ports
def main():
target = input(“Enter the website URL or IP address to scan for open ports: “)
open_ports = scan_top_ports(target)
if not open_ports:
print(“No open ports found on the target.”)
else:
print(“Open ports and associated vulnerabilities:”)
display_table(open_ports)
if __name__ == “__main__”:
main()
/07/ 密码管理器
作为一名数字自由职业者,最糟糕的事情之一就是需要记住很多密码,因为每天你都要注册一个新网站。
这个自动化脚本可以帮你管理所有密码,使用不同的加密技术确保密码安全,只有你自己才能访问。
这个脚本最棒的地方在于它是一个网络应用程序,只需稍作改动,你就可以将它部署到云存储上,随时随地访问你的所有密码,而无需担心安全问题。
import streamlit as st
import csv
from cryptography.fernet import Fernet
from cryptography.fernet import InvalidToken
# Custom encryption key (hardcoded)
CUSTOM_ENCRYPTION_KEY = b’u7wGgNdDFefqpr_kGxb8wJf6XRVsRwvb3QgITsD5Ft4=’ ## 如果您打算在共享平台上使用此脚本,请确保将此密钥保存在一个单独的安全文件中。
# Function to encrypt password
def encrypt_password(password):
cipher_suite = Fernet(CUSTOM_ENCRYPTION_KEY)
encrypted_password = cipher_suite.encrypt(password.encode())
return encrypted_password
# Function to decrypt password
def decrypt_password(encrypted_password):
if isinstance(encrypted_password, bytes):
try:
cipher_suite = Fernet(CUSTOM_ENCRYPTION_KEY)
decrypted_password = cipher_suite.decrypt(encrypted_password)
return decrypted_password.decode()
except InvalidToken:
return “Invalid Token”
else:
return None
# Function to save website name and password to CSV file
def save_credentials(website_name, password):
encrypted_password = encrypt_password(password)
with open(‘credentials.csv’, ‘a’, newline=”) as csvfile:
writer = csv.writer(csvfile)
writer.writerow([website_name, encrypted_password.decode()]) # Ensure storing string representation
# Function to retrieve password from CSV file
def retrieve_password(website_name):
with open(‘credentials.csv’, ‘r’) as csvfile:
reader = csv.reader(csvfile)
for row in reader:
if row[0] == website_name:
encrypted_password = row[1].encode()
return encrypted_password
return None
# Streamlit UI
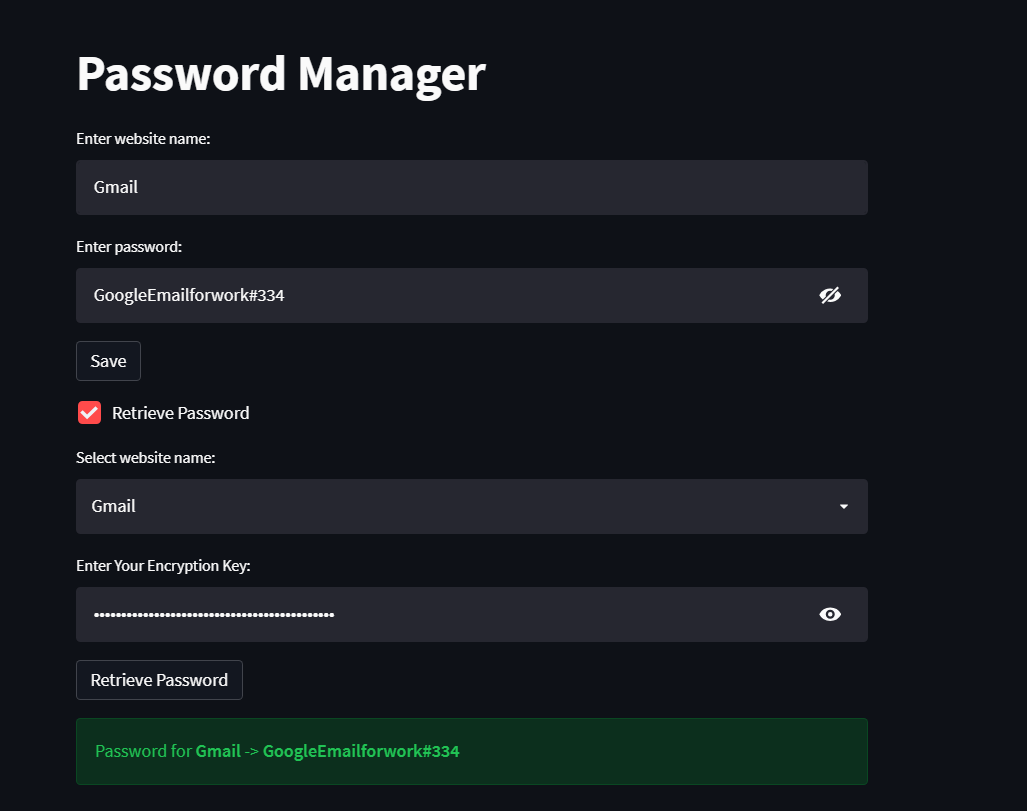
st.title(“Password Manager”)
# Input fields for website name and password
website_name = st.text_input(“Enter website name:”)
password = st.text_input(“Enter password:”, type=“password”)
# Save button to save website name and password
if st.button(“Save”):
if website_name and password:
save_credentials(website_name, password)
st.success(“Website name and password saved successfully.”)
else:
st.error(“Please fill in all fields.”)
# Retrieve button to retrieve password
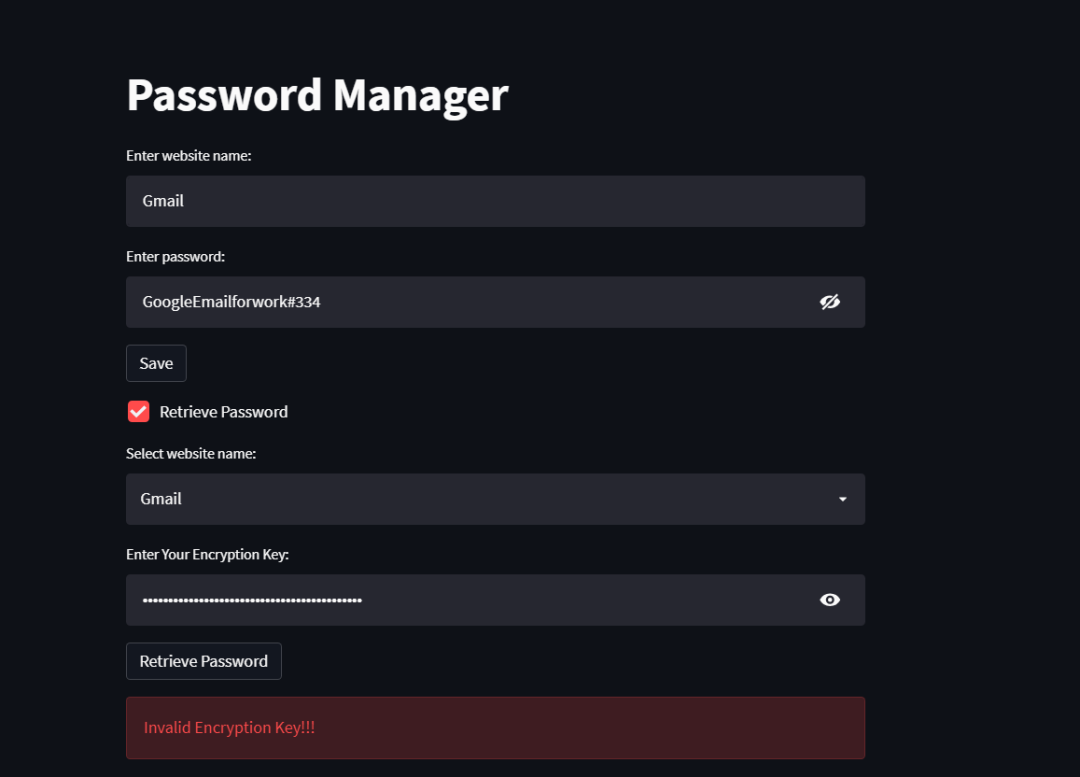
if st.checkbox(“Retrieve Password”):
website_name = st.selectbox(“Select website name:”, options=[“”] + [row[0] for row in csv.reader(open(‘credentials.csv’, ‘r’))])
key = st.text_input(“Enter Your Encryption Key:”, type=“password”)
if st.button(“Retrieve Password”):
if key == str(CUSTOM_ENCRYPTION_KEY.decode()):
if website_name:
encrypted_password = retrieve_password(website_name)
if encrypted_password:
decrypted_password = decrypt_password(encrypted_password)
st.success(f”Password for **{website_name}** -> **{decrypted_password}**”)
else:
st.error(“Password not found in database.”)
elif key == “”:
pass
else:
st.error(“Invalid Encryption Key!!!”)
它使用硬编码的自定义密钥进行加密和解密。如果你打算在共享平台上使用此脚本,请确保将此密钥保存在一个单独的安全文件中。
/08/ 邮件群发器
电子邮件列表是在线参与的货币,每个订阅者都是您数字部落的重要成员。它们是有效数字营销的心脏。
作为一个有影响力的数字营销者,与你的追随者保持互动非常重要,但手动操作是一项艰巨的工作,而使用相关工具则需要花费大量资金。
这款自动化脚本可利用 Gmail 自带的 SMTP 服务器,在几分钟内批量发送电子邮件,让你可以完全自定义并行使权力。
import smtplib
import ssl
# SMTP server details
smtp_server = ‘data.STUDIO.com’
smtp_port = 465
# Sender and recipient details
from_address = ‘Winzo Shop’
to_address = [”,”] ## Recepients List
# Authentication details
username = ” ## Sender Email
password = ” ## Sender Password
# Email message details
subject = ‘🎉 Exclusive Offer Inside! Get 10% Off Your Next Purchase’
body = ”’
”’
# Create an SSL/TLS context
context = ssl.create_default_context()
# Connect to the SMTP server using SSL/TLS
with smtplib.SMTP_SSL(smtp_server, smtp_port, context=context) as server:
# Enable debugging to print the server’s responses
server.set_debuglevel(1)
# Login to the SMTP server
server.login(username, password)
# Create the email message
message = f’From: {from_address}rnSubject: {subject}rnTo: {to_address}rnrn{body}‘
message = message.encode() # Convert the message to bytes
# Send the email
server.sendmail(from_address, to_address, message)
/09/ Readme.md 生成器
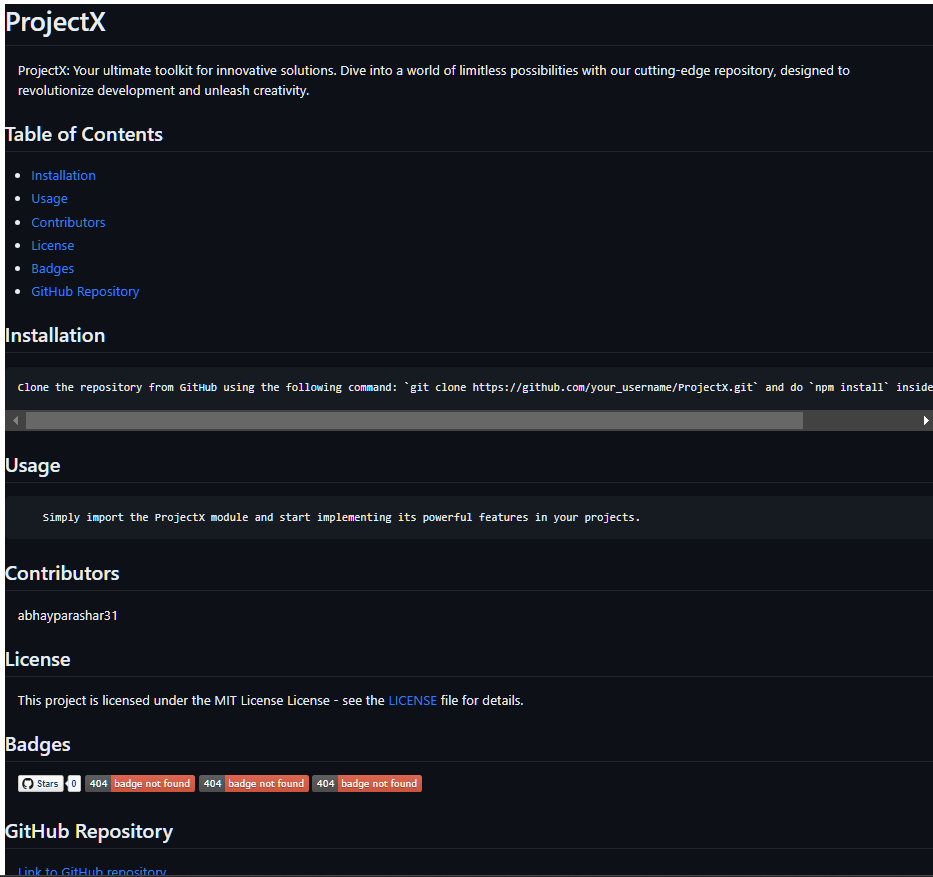
README.md 文件是项目的入口,提供基本信息并吸引访问者进一步探索。它被认为是版本库中最重要的文件之一,但创建起来也相当耗时。
这个自动化脚本可以根据版本库名称、链接和描述等输入信息轻松生成 README.md 文件,从而为您节省大量时间。
def generate_markdown_file():
    # Prompting user for inputs
    repository_name = input("n Enter the name of your GitHub repository: ")
    project_description = input("Enter a short description of your project: ")
    installation_instructions = input("Enter installation instructions for your project: ")
    usage_instructions = input("Enter usage instructions for your project: ")
    contributors = input("Enter the contributors to your project (separated by commas): ")
    license = select_license()
# Generating badges
stars_badge = “[](https://github.com/{}/stargazers)”.format(repository_name, repository_name)
forks_badge = “[](https://github.com/{}/network/members)”.format(repository_name, repository_name)
issues_badge = “[](https://github.com/{}/issues)”.format(repository_name, repository_name)
license_badge = “[](https://github.com/{}/blob/master/LICENSE)”.format(repository_name, repository_name)
# Generating Markdown content
markdown_content = f”””
# {repository_name}
{project_description}
## Table of Contents
– [Installation](#installation)
– [Usage](#usage)
– [Contributors](#contributors)
– [License](#license)
– [Badges](#badges)
– [GitHub Repository](#github-repository)
## Installation
“`
{installation_instructions}
“`
## Usage
“`
{usage_instructions}
“`
## Contributors
{contributors}
## License
This project is licensed under the {license} License – see the [LICENSE](LICENSE) file for details.
## Badges
{stars_badge} {forks_badge} {issues_badge} {license_badge}
## GitHub Repository
[Link to GitHub repository](https://github.com/{repository_name})
“””
# Writing content to Markdown file
markdown_file_name = f”{repository_name}_README.md”
with open(markdown_file_name, “w”) as markdown_file:
markdown_file.write(markdown_content)
print(f”Markdown file ‘{markdown_file_name}‘ generated successfully!”)
def select_license():
licenses = {
“MIT”: “MIT License”,
“Apache”: “Apache License 2.0”,
“GPL”: “GNU General Public License v3.0”,
# Add more licenses as needed
}
print(“Select a license for your project:”)
for key, value in licenses.items():
print(f”{key}: {value}“)
while True:
selected_license = input(“Enter the number corresponding to your selected license: “)
if selected_license in licenses:
return licenses[selected_license]
else:
print(“Invalid input. Please enter a valid license number.”)
if __name__ == “__main__”:
generate_markdown_file()

/10/ OrganizeIT 2.0
你的下载文件夹是否一团糟?你是否发现自己在最需要的时候却找不到关键文件?你是否尝试过无数次整理文件夹,但都以失败告终?
这个自动化脚本可以帮你在几分钟内整理好文件夹。你只需指定需要清理的路径,本脚本就会根据文件扩展名自动将所有文件划分到不同的文件夹中。
这还不是全部它还能通过比较文件的哈希值来检测和处理重复文件。
import os
import hashlib
import shutil
def get_file_hash(file_path):
with open(file_path, ‘rb’) as f:
return hashlib.sha256(f.read()).hexdigest()
def organize_and_move_duplicates(folder_path):
# Create a dictionary to store destination folders based on file extensions
extension_folders = {}
# Create the “Duplicates” folder if it doesn’t exist
duplicates_folder = os.path.join(folder_path, ‘Duplicates’)
os.makedirs(duplicates_folder, exist_ok=True)
# Create a dictionary to store file hashes
file_hashes = {}
# Iterate through files in the folder
for filename in os.listdir(folder_path):
file_path = os.path.join(folder_path, filename)
if os.path.isfile(file_path):
# Get the file extension
_, extension = os.path.splitext(filename)
extension = extension.lower() # Convert extension to lowercase
# Determine the destination folder
if extension in extension_folders:
destination_folder = extension_folders[extension]
else:
destination_folder = os.path.join(folder_path, extension[1:]) # Remove the leading dot from the extension
os.makedirs(destination_folder, exist_ok=True)
extension_folders[extension] = destination_folder
# Calculate the file hash
file_hash = get_file_hash(file_path)
# Check for duplicates
if file_hash in file_hashes:
# File is a duplicate, move it to the “Duplicates” folder
shutil.move(file_path, os.path.join(duplicates_folder, filename))
print(f”Moved duplicate file {filename} to Duplicates folder.”)
else:
# Store the file hash
file_hashes[file_hash] = filename
# Move the file to the destination folder
shutil.move(file_path, destination_folder)
print(f”Moved {filename} to {destination_folder}“)
if __name__ == “__main__”:
folder_path = input(“Enter the path to the folder to organize: “)
organize_and_move_duplicates(folder_path)


原创文章,作者:guozi,如若转载,请注明出处:https://www.sudun.com/ask/90699.html