
@Qualifier(\’primaryRabbitMqDataSourceFactory\’) ConnectionFactory connectionFactory) {
SimpleRabbitListenerContainerFactory 工厂=new SimpleRabbitListenerContainerFactory();
配置器.configure(工厂,connectionFactory);
返回工厂。
}
/\\*\\*
*从配置文件中读取rabbit mq数据源aaaa的配置类,并组装到类中的rabbitmq属性中。
* 注意:RabbitProperties类属于org.springframework.boot.autoconfigure.amqp包,它包含以下属性:您不需要创建自己的类来保存相关属性。
* 主机、端口、用户名、密码、虚拟主机、SSL。
* 将yml文件中Rabbit MQ相关连接信息aaaa注入到RabbitProperties类中,需要设置主机、端口、用户名、密码、虚拟主机、ssl前缀,如下所示。
* app.rabbitmq-datasource-aaaa.rabbitmq 以及具体的主机、端口、用户名、密码、virtualHost 和ssl 由以下格式组成:
* app.rabbitmq-datasource-aaaa.rabbitmq.host=122.9.140.213
* app.rabbitmq-datasource-aaaa.rabbitmq.port=5672
* app.rabbitmq-datasource-aaaa.rabbitmq.username=guest
* app.rabbitmq-datasource-aaaa.rabbitmq.password=访客
* app.rabbitmq-datasource-aaaa.rabbitmq.virtual-host=/
* 如果SSL是对象,则仍然使用SSL相关的设置,如:
* app.rabbitmq-datasource-aaaa.rabbitmq.ssl.enabled=true
*
* 创建该项目的核心是使用该类将配置文件中的Rabbit MQ数据源加载到配置类中,并通过自动组装相关代码来连接Rabbit MQ数据源。
*当我在2022年底做一个项目时,我需要连接两个rabbit mq,而我旧项目中的rabbit mq很容易连接。专用于新项目的rabbit mq配置了SSL连接。我长期以来一直在研究多数据源配置。
*我什至不知道如何配置SSL连接,但我很惊讶其他人可以同时使用这种配置方法并且能够这样做。
*/
@getter
@设置者
@ConfigurationProperties(前缀=“app.rabbitmq-datasource-primary”)
@Component(值=“primaryRabbitmqProperties”)
静态类PrimaryRabbitMqConfigProperties {
私有RabbitProperties Rabbitmq;
}
}
* RabbitMQ队列声明相关的主要数据源配置类
导入org.springframework.amqp.core.*。
导入org.springframework.amqp.rabbit.core.RabbitAdmin。
导入org.springframework.context.annotation.Bean。
导入org.springframework.context.annotation.Configuration。
/**
* 声明队列、交换机、绑定以及该队列上的其他信息
*/
@作品
公共类PrimaryRabbitMqBindConfig {
公共静态最终字符串PRIMARY_QUEUE_NAME=“primary_queue_name”;
/\\*\\*
* 声明一个Queue队列,队列名称为PRIMARY_QUEUE_NAME
*/
@Bean(PRIMARY_QUEUE_NAME)
公共队列bootQueue(RabbitAdmin RabbitAdmin) {
队列队列=新队列(PRIMARY_QUEUE_NAME);
队列.setAdminsThatShouldDeclare(rabbitAdmin);
返回队列。
}
}
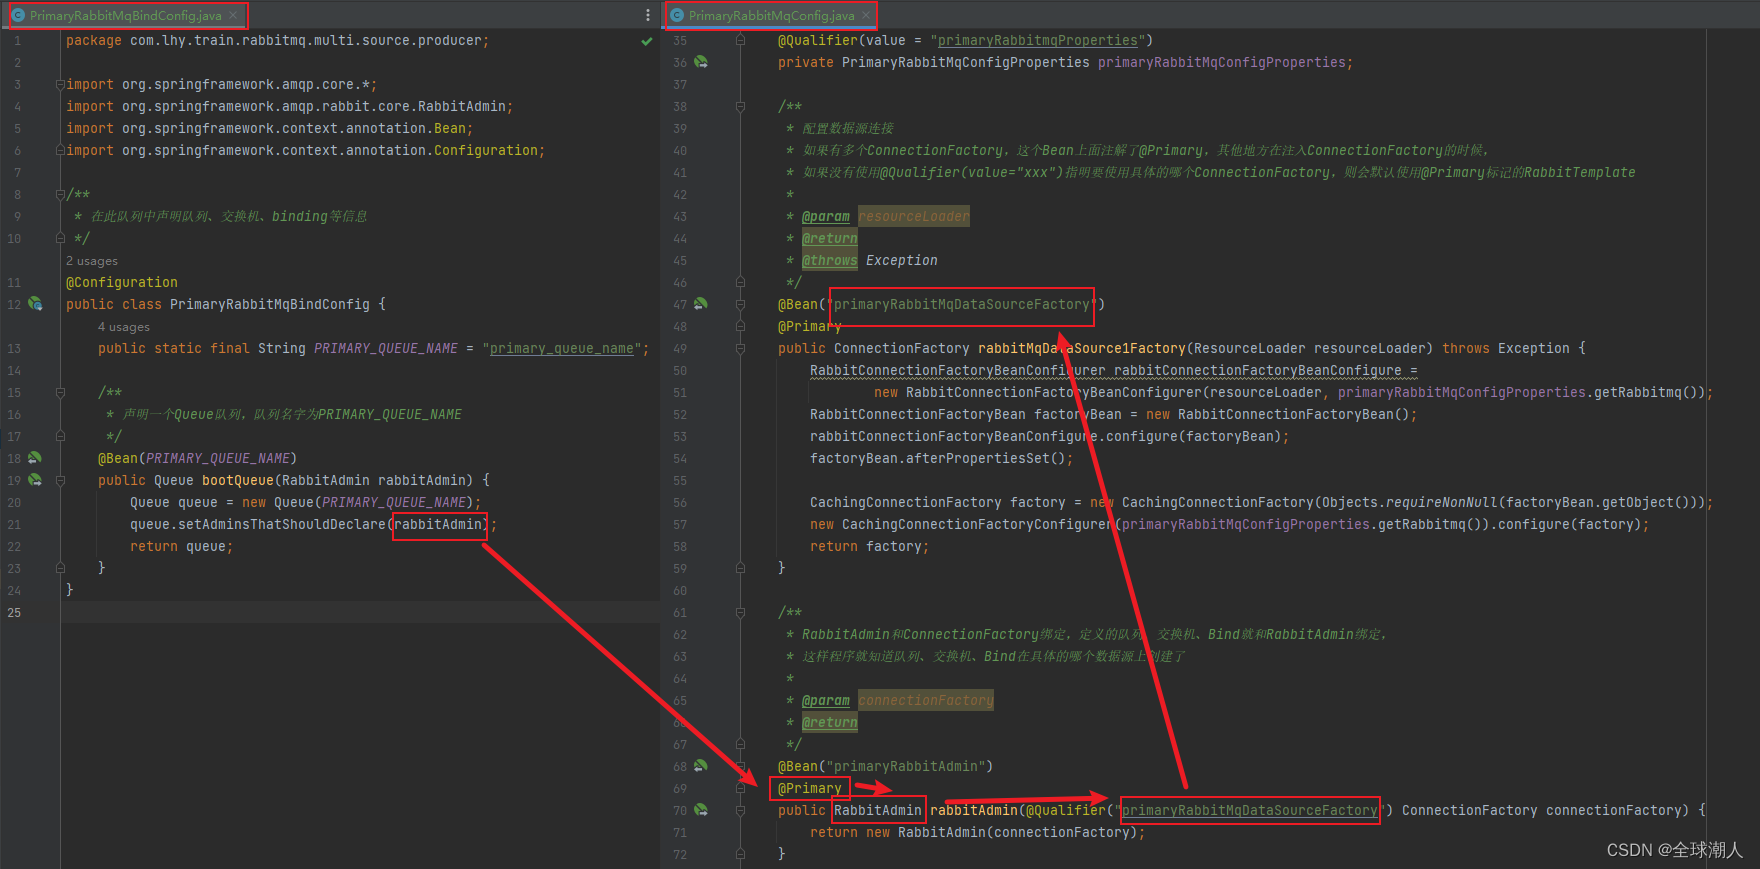
声明队列时,需要将其绑定到特定的数据源,因为本项目有多个Rabbitmq数据源。具体方法是将队列绑定到RabbitAdmin,RabbitAdmin又绑定到特定的数据源。此外,两个数据源的队列声明类似,如下所示。
* 配置第一个辅助数据源
导入lombok.Getter。
导入lombok.Setter。
导入org.springframework.amqp.rabbit.config.SimpleRabbitListenerContainerFactory。
导入org.springframework.amqp.rabbit.connection.CachingConnectionFactory。
导入org.springframework.amqp.rabbit.connection.ConnectionFactory。
导入org.springframework.amqp.rabbit.connection.RabbitConnectionFactoryBean。
导入org.springframework.amqp.rabbit.core.RabbitAdmin。
导入org.springframework.amqp.rabbit.core.RabbitTemplate。
导入org.springframework.beans.factory.annotation.Autowired。
导入org.springframework.beans.factory.annotation.Qualifier。
导入org.springframework.boot.autoconfigure.amqp.CachingConnectionFactoryConfigurer。
导入org.springframework.boot.autoconfigure.amqp.RabbitConnectionFactoryBeanConfigurer。
导入org.springframework.boot.autoconfigure.amqp.RabbitProperties。
导入org.springframework.boot.autoconfigure.amqp.SimpleRabbitListenerContainerFactoryConfigurer。
导入org.springframework.boot.context.properties.ConfigurationProperties。
导入org.springframework.context.annotation.Bean。
导入org.springframework.context.annotation.Configuration。
导入org.springframework.core.io.ResourceLoader。
导入org.springframework.stereotype.Component。
导入java.util.Objects。
/**
* 此类别可以参考:
* SpringBoot配置多个RabbitMQ源。
* https://blog.csdn.net/Yu_Mariam/article/details/123938940
* https://blog.csdn.net/tmr1016/article/details/108623855
*/
@作品
公共类Business1RabbitMqConfig {
@Autowired
@Qualifier(值=“business1RabbitmqProperties”)
私有Business1RabbitMqConfigProperties 业务1RabbitMqConfigProperties;
/\\*\\*
* 配置数据源连接
*
* @param 资源加载器
* @返回
* @抛出异常
*/
@Bean(\”business1RabbitMqDataSourceFactory\”)
公共ConnectionFactory RabbitMqDataSource1Factory(ResourceLoader资源加载器)抛出异常{
RabbitConnectionFactoryBeanConfigurer RabbitConnectionFactoryBeanConfigure=
新的RabbitConnectionFactoryBeanConfigurer(resourceLoader,business1RabbitMqConfigProperties.getRabbitmq());
RabbitConnectionFactoryBean FactoryBean=new RabbitConnectionFactoryBean();
RabbitConnectionFactoryBeanConfigure.configure(factoryBean);
FactoryBean.afterPropertiesSet();
CachingConnectionFactory 工厂=new CachingConnectionFactory(Objects.requireNonNull(factoryBean.getObject()));
新的CachingConnectionFactoryConfigurer(business1RabbitMqConfigProperties.getRabbitmq()).configure(factory);
返回工厂。
}
/\\*\\*
* RabbitAdmin与ConnectionFactory绑定,定义的队列、交换机、Binds与RabbitAdmin绑定。
* 这样程序就知道队列、交换机或绑定是针对哪个特定数据源创建的。
* 如果有多个数据源,并且RabbitAdmin中只配置了一个数据源,则所有队列、交换器和绑定都在RabbitAdmin绑定的数据源上创建。
* @param 连接工厂
* @返回
*/
@Bean(“business1RabbitAdmin”)
公共RabbitAdmin RabbitAdmin(@Qualifier(\”business1RabbitMqDataSourceFactory\”)ConnectionFactory 连接工厂) {
返回一个新的RabbitAdmin(connectionFactory)。
}
/\\*\\*
*为生产者设置兔子模板(如果生产者不存在,该类可以删除)
* RabbitTemplate 不需要与RabbitAdmin 关联,因为它已经与包含IP、用户、密码和其他连接信息的ConnectionFactory 关联。
*
* @param 连接工厂
* @返回
*/
@Bean(名称=“business1RabbitTemplate”)
公共RabbitTemplate innerRabbitTemplate(@Qualifier(\”business1RabbitMqDataSourceFactory\”) ConnectionFactory connectionFactory) {
返回一个新的RabbitTemplate(connectionFactory)。
}
/\\*\\*
* 获取消费者通道监听类(如果不存在消费者则可以去掉该类)
* 不需要将消费者与RabbitAdmin 关联,因为消费者已经与ConnectionFactory 关联,其中包含IP、用户、密码和其他连接信息。
*/
@Bean(名称=“business1ListenerFactory”)
公共SimpleRabbitListenerContainerFactoryinnerFactory(SimpleRabbitListenerContainerFactoryConfigurer配置器,
@Qualifier(\”business1RabbitMqDataSourceFactory\”) ConnectionFactory connectionFactory) {
SimpleRabbitListenerContainerFactory 工厂=new SimpleRabbitListenerContainerFactory();
配置器.configure(工厂,connectionFactory);
返回工厂。
}
/\\*\\*
*从配置文件中读取rabbit mq数据源business1的配置类,组装到类中的rabbitmq属性中。
* 注意:RabbitProperties类属于org.springframework.boot.autoconfigure.amqp包,它包含以下属性:您不需要创建自己的类来保存相关属性。
* 主机、端口、用户名、密码、虚拟主机、SSL。
* 将yml文件中business1的Rabbit MQ相关连接信息注入到RabbitProperties类中,需要配置主机、端口、用户名、密码、虚拟主机、ssl前缀,如下:
* app.rabbitmq-datasource-business1.rabbitmq 以及具体的主机、端口、用户名、密码、virtualHost 和ssl 由以下格式组成:
* app.rabbitmq-datasource-business1.rabbitmq.host=122.9.140.213
* app.rabbitmq-datasource-business1.rabbitmq.port=5672
* app.rabbitmq-datasource-business1.rabbitmq.username=guest
* app.rabbitmq-datasource-business1.rabbitmq.password=guest
* app.rabbitmq-datasource-business1.rabbitmq.virtual-host=/
* 如果SSL是对象,则仍然使用SSL相关的设置,如:
* app.rabbitmq-datasource-business1.rabbitmq.ssl.enabled=true
*
* 创建该项目的核心是使用该类将配置文件中的Rabbit MQ数据源加载到配置类中,并通过自动组装相关代码来连接Rabbit MQ数据源。
*当我在2022年底做一个项目时,我需要连接两个rabbit mq,而我旧项目中的rabbit mq很容易连接。专用于新项目的rabbit mq配置了SSL连接。我长期以来一直在研究多数据源配置。
*我什至不知道如何配置SSL连接,但我很惊讶其他人可以同时使用这种配置方法并且能够这样做。
*/
@getter
@设置者
@ConfigurationProperties(前缀=“app.rabbitmq-datasource-business1”)
@Component(值=“business1RabbitmqProperties”)
静态类Business1RabbitMqConfigProperties {
私有RabbitProperties Rabbitmq;
}
}
* 第一个辅助数据源队列声明
导入org.springframework.amqp.core.Queue。
导入org.springframework.amqp.rabbit.core.RabbitAdmin。
导入org.springframework.beans.factory.annotation.Qualifier。
导入org.springframework.context.annotation.Bean。
导入org.springframework.context.annotation.Configuration。
/**
* 声明队列、交换机、绑定以及该队列上的其他信息
*/
@作品
公共类Business1RabbitMqBindConfig {
公共静态最终字符串BUSINESS_1_QUEUE_NAME=“business_1_queue_name”;
/\\*\\*
* 声明一个队列名称为BUSINESS_1_QUEUE_NAME 的Queue 队列
* 该队列绑定到business1RabbitAdmin,而business1RabbitAdmin又绑定到特定的数据源。
* 这使您可以知道队列是在哪个数据源中创建的。
*/
@Bean(BUSINESS_1_QUEUE_NAME)
公共队列bootQueue(@Qualifier(\”business1RabbitAdmin\”) RabbitAdmin RabbitAdmin) {
队列队列=新队列(BUSINESS_1_QUEUE_NAME);
队列.setAdminsThatShouldDeclare(rabbitAdmin);
返回队列。
}
}
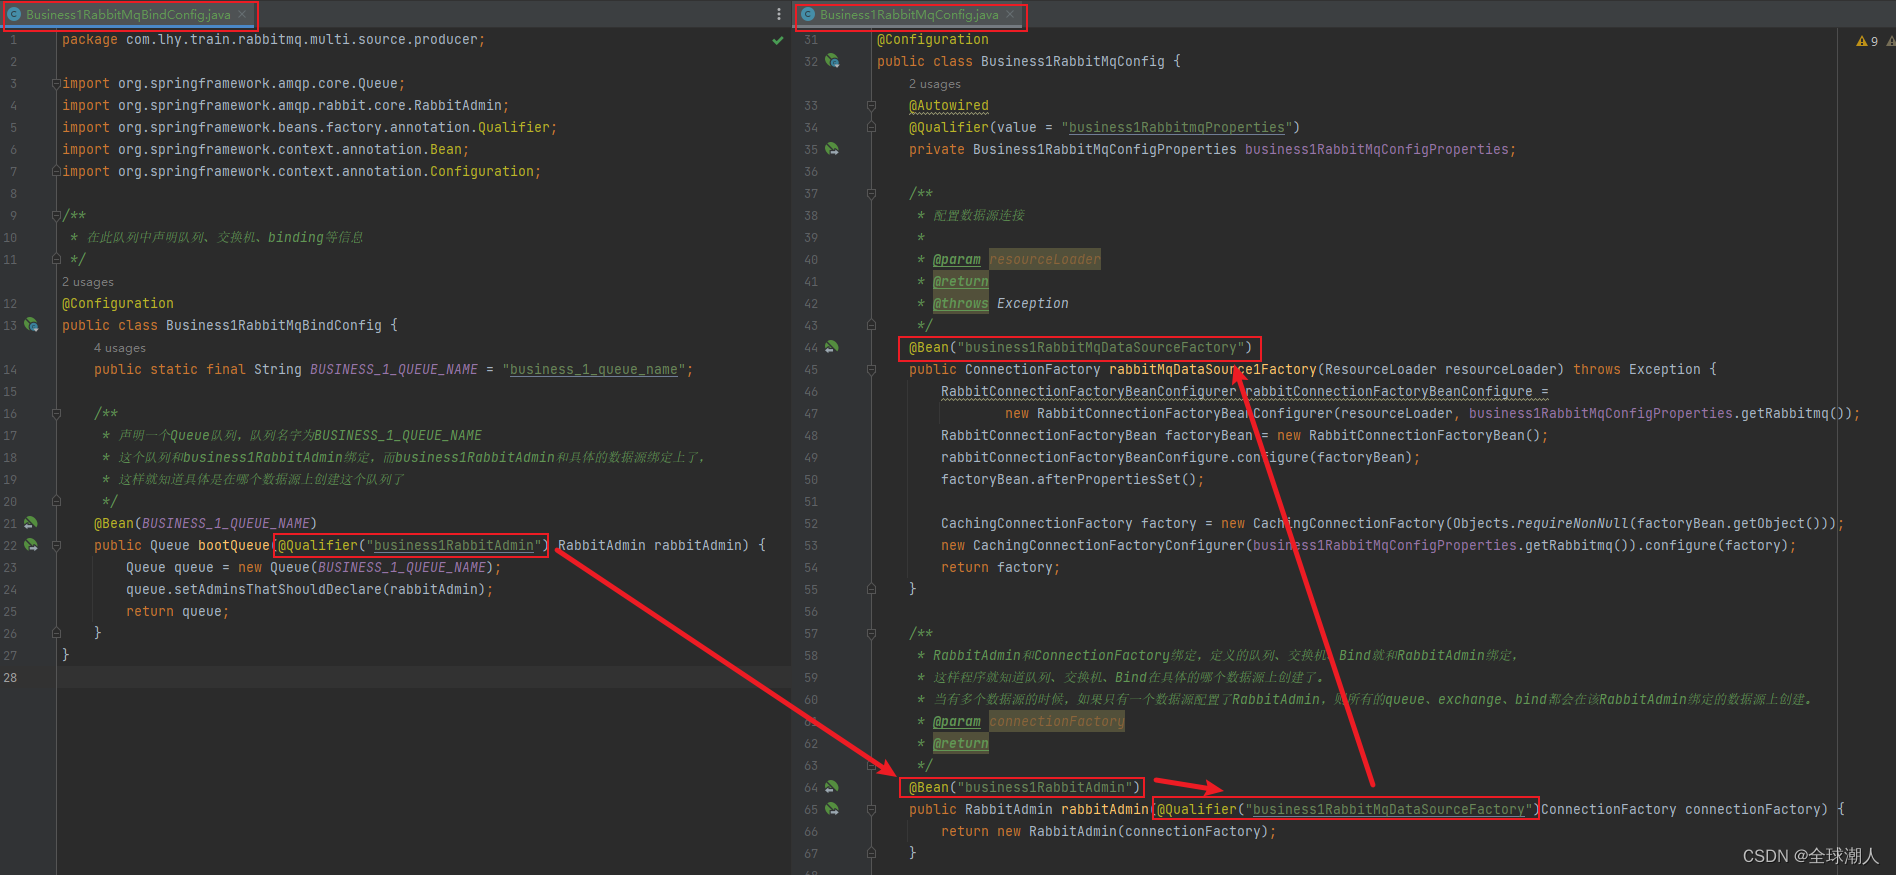
声明队列时,需要将其绑定到特定的数据源,因为本项目有多个Rabbitmq数据源。具体方法是将队列绑定到RabbitAdmin,RabbitAdmin又绑定到特定的数据源。此外,两个数据源的队列声明类似,如下所示。
* 第二个辅助数据源的连接配置
导入lombok.Getter。
导入lombok.Setter。
导入org.springframework.amqp.rabbit.config.SimpleRabbitListenerContainerFactory。
导入org.springframework.amqp.rabbit.connection.CachingConnectionFactory。
导入org.springframework.amqp.rabbit.connection.ConnectionFactory。
导入org.springframework.amqp.rabbit.connection.RabbitConnectionFactoryBean。
导入org.springframework.amqp.rabbit.core.RabbitAdmin。
导入org.springframework.amqp.rabbit.core.RabbitTemplate。
导入org.springframework.beans.factory.annotation.Autowired。
导入org.springframework.beans.factory.annotation.Qualifier。
导入org.springframework.boot.autoconfigure.amqp.CachingConnectionFactoryConfigurer。
导入org.springframework.boot.autoconfigure.amqp.RabbitConnectionFactoryBeanConfigurer。
导入org.springframework.boot.autoconfigure.amqp.RabbitProperties。
导入org.springframework.boot.autoconfigure.amqp.SimpleRabbitListenerContainerFactoryConfigurer。
导入org.springframework.boot.context.properties.ConfigurationProperties。
导入org.springframework.context.annotation.Bean。
导入org.springframework.context.annotation.Configuration。
导入org.springframework.core.io.ResourceLoader。
导入org.springframework.stereotype.Component。
进口商
va.util.Objects;
/**
* 此类可以参考:
* SpringBoot配置多个RabbitMQ源:
* https://blog.csdn.net/Yu_Mariam/article/details/123938940
* https://blog.csdn.net/tmr1016/article/details/108623855
*/
@Configuration
public class Business2RabbitMqConfig {
@Autowired
@Qualifier(value = “business2RabbitmqProperties”)
private Business2RabbitMqConfigProperties business2RabbitMqConfigProperties;
/\\*\\*
* 配置数据源连接
*
* @param resourceLoader
* @return
* @throws Exception
*/
@Bean(“business2RabbitMqDataSourceFactory”)
public ConnectionFactory rabbitMqDataSource1Factory(ResourceLoader resourceLoader) throws Exception {
RabbitConnectionFactoryBeanConfigurer rabbitConnectionFactoryBeanConfigure =
new RabbitConnectionFactoryBeanConfigurer(resourceLoader, business2RabbitMqConfigProperties.getRabbitmq());
RabbitConnectionFactoryBean factoryBean = new RabbitConnectionFactoryBean();
rabbitConnectionFactoryBeanConfigure.configure(factoryBean);
factoryBean.afterPropertiesSet();
CachingConnectionFactory factory = new CachingConnectionFactory(Objects.requireNonNull(factoryBean.getObject()));
new CachingConnectionFactoryConfigurer(business2RabbitMqConfigProperties.getRabbitmq()).configure(factory);
return factory;
}
/\\*\\*
* RabbitAdmin和ConnectionFactory绑定,定义的队列、交换机、Bind就和RabbitAdmin绑定,
* 这样程序就知道队列、交换机、Bind在具体的哪个数据源上创建了。
* 当有多个数据源的时候,如果只有一个数据源配置了RabbitAdmin,则所有的queue、exchange、bind都会在该RabbitAdmin绑定的数据源上创建。
*
* @param connectionFactory
* @return
*/
@Bean(“business2RabbitAdmin”)
public RabbitAdmin rabbitAdmin(@Qualifier(“business2RabbitMqDataSourceFactory”) ConnectionFactory connectionFactory) {
return new RabbitAdmin(connectionFactory);
}
/\\*\\*
* 配置生产者的rabbit template(无生产者可删除此类)
*
* @param connectionFactory
* @return
*/
@Bean(name = “business2RabbitTemplate”)
public RabbitTemplate innerRabbitTemplate(@Qualifier(“business2RabbitMqDataSourceFactory”) ConnectionFactory connectionFactory) {
return new RabbitTemplate(connectionFactory);
}
/\\*\\*
* 获取消费者通道监听类(无消费者可删除此类)
*/
@Bean(name = “business2ListenerFactory”)
public SimpleRabbitListenerContainerFactory innerFactory(SimpleRabbitListenerContainerFactoryConfigurer configurer,
@Qualifier(“business2RabbitMqDataSourceFactory”) ConnectionFactory connectionFactory) {
SimpleRabbitListenerContainerFactory factory = new SimpleRabbitListenerContainerFactory();
configurer.configure(factory, connectionFactory);
return factory;
}
/\\*\\*
* 从配置文件中读取business2这个rabbit mq数据源的配置类,然后装配到类中的rabbitmq属性中。
* 注:RabbitProperties这个类属于org.springframework.boot.autoconfigure.amqp包,里面有以下属性,不需要我们再自己写一个类来承载相关的属性:
* host、port、username、password、virtualHost、ssl。
* 要将yml文件中的business2这个rabbit mq相关的连接信息注入到RabbitProperties类中,需要将host、port、username、password、virtualHost、ssl的前缀配置成如下:
* app.rabbitmq-datasource-business2.rabbitmq,而具体的host、port、username、password、virtualHost、ssl配置成如下格式:
* app.rabbitmq-datasource-business2.rabbitmq.host=122.9.140.213
* app.rabbitmq-datasource-business2.rabbitmq.port=5672
* app.rabbitmq-datasource-business2.rabbitmq.username=guest
* app.rabbitmq-datasource-business2.rabbitmq.password=guest
* app.rabbitmq-datasource-business2.rabbitmq.virtual-host=/
* ssl是一个对象,则ssl相关的配置就继续使用.进行配置,如:
* app.rabbitmq-datasource-business2.rabbitmq.ssl.enabled=true
*
* 创建这个工程的核心就是为了使用这个类,将配置文件中的rabbit mq数据源读到配置类中,再通过自动装配相关的代码,连接rabbit mq数据源。
* 2022年末在做一个项目时,当时要连接两个rabbit mq,当时老项目的rabbitmq很轻松地连上了,新项目专用的rabbit mq配置了ssl连接,多数据源配置研究了很久,
* 都不知道怎么配置ssl连接,另一个同时就使用了这种配置方式,快速地解决了这个问题,我当时惊为天人,还能这样操作。
*/
@Getter
@Setter
@ConfigurationProperties(prefix = “app.rabbitmq-datasource-business2”)
@Component(value = “business2RabbitmqProperties”)
static class Business2RabbitMqConfigProperties {
private RabbitProperties rabbitmq;
}
}
* 第二个次数据源的队列声明
import org.springframework.amqp.core.Queue;
import org.springframework.amqp.rabbit.core.RabbitAdmin;
import org.springframework.beans.factory.annotation.Qualifier;
import org.springframework.context.annotation.Bean;
import org.springframework.context.annotation.Configuration;
/**
* 在此队列中声明队列、交换机、binding等信息
*/
@Configuration
public class Business2RabbitMqBindConfig {
public static final String BUSINESS_2_QUEUE_NAME = “business_2_queue_name”;
/\\*\\*
* 声明一个Queue队列,队列名字为BUSINESS_2_QUEUE_NAME
* 这个队列和business2RabbitAdmin绑定,而business2RabbitAdmin和具体的数据源绑定上了,
* 这样就知道具体是在哪个数据源上创建这个队列了
*/
@Bean(BUSINESS_2_QUEUE_NAME)
public Queue bootQueue(@Qualifier(“business2RabbitAdmin”) RabbitAdmin rabbitAdmin) {
Queue queue = new Queue(BUSINESS_2_QUEUE_NAME);
queue.setAdminsThatShouldDeclare(rabbitAdmin);
return queue;
}
}
注意队列与数据源绑定的方式
### 生产者工程的代码与配置
* 生产者application.yml配置
spring:
profiles:
include: rabbitmq
* 生产者启动类
import org.springframework.boot.SpringApplication;
import org.springframework.boot.autoconfigure.SpringBootApplication;
import org.springframework.context.annotation.ComponentScan;
/**
* 由于三个RabbitMq数据源和队列相关声明全在rabbitmq-common-setting工程中,
* 而rabbitmq-common-setting工程的RabbitMq配置所在的包不在本启动类的扫描路径中,
* 所以需要使用ComponentScan来将rabbitmq-common-setting工程中RabbitMq配置所在的包名包含在扫描路径中,具体的包名是
* “com.qqcr.train.rabbitmq.multi.source.common.setting”。
*/
@SpringBootApplication
@ComponentScan(value = {“com.qqcr.train.rabbitmq.multi.source.common.setting”})
public class ProducerApplication {
public static void main(String[] args) {
SpringApplication.run(ProducerApplication.class, args);
}
}
* 生产者测试类ProducerTest
import org.junit.jupiter.api.Test;
import org.springframework.amqp.rabbit.core.RabbitTemplate;
import org.springframework.beans.factory.annotation.Autowired;
import org.springframework.beans.factory.annotation.Qualifier;
import org.springframework.boot.test.context.SpringBootTest;
/**
* 参考博客:
* https://blog.csdn.net/Cey_Tao/article/details/128098509
*/
@SpringBootTest
public class ProducerTest {
@Autowired
private RabbitTemplate rabbitTemplate;
@Autowired
@Qualifier(\”business1RabbitTemplate\”)
private RabbitTemplate business1RabbitTemplate;
@Autowired
@Qualifier(\”business2RabbitTemplate\”)
private RabbitTemplate business2RabbitTemplate;
/\\*\\*
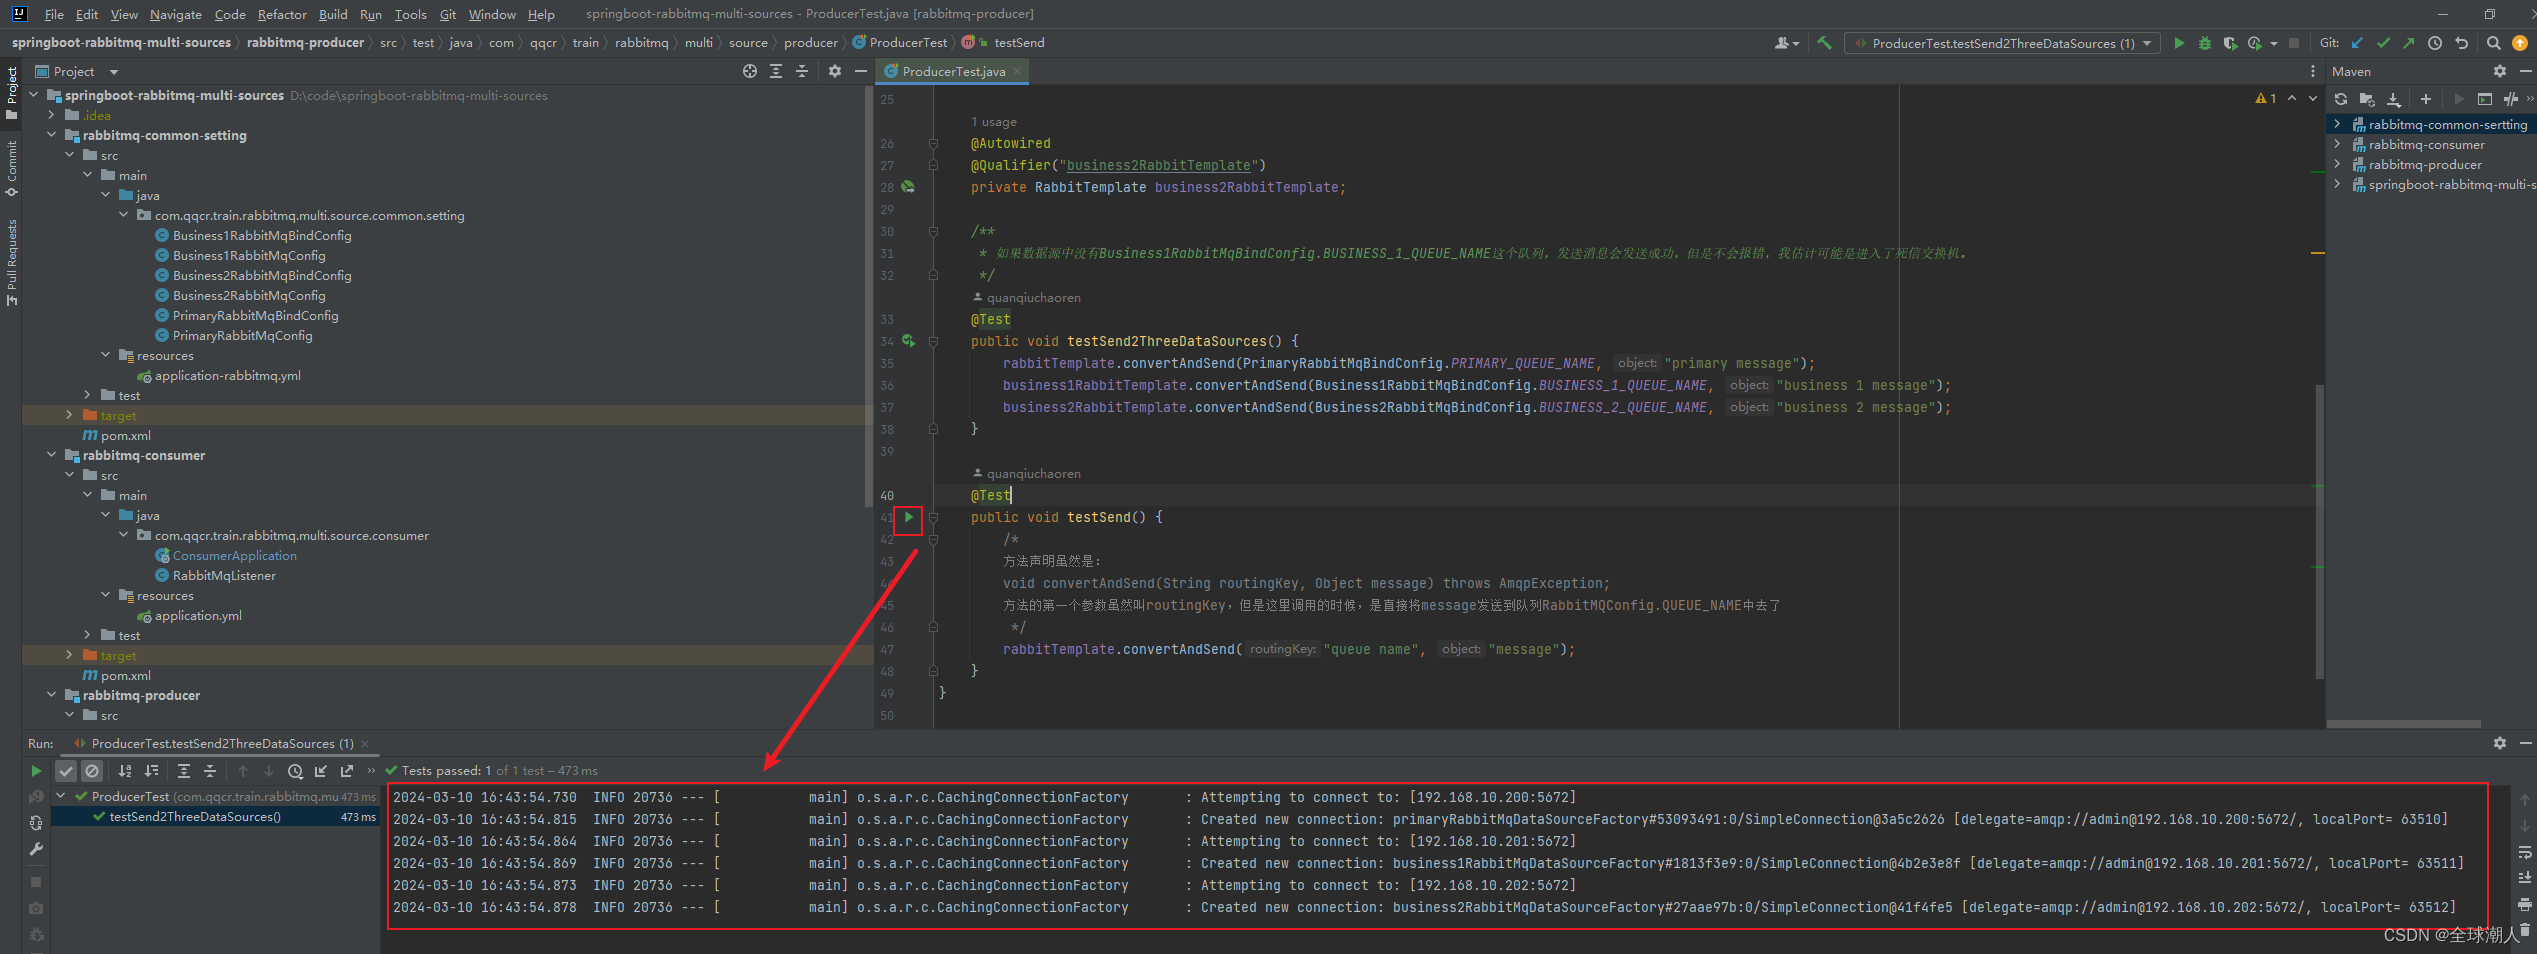
* 如果数据源中没有Business1RabbitMqBindConfig.BUSINESS_1_QUEUE_NAME这个队列,发送消息会发送成功,但是不会报错,我估计可能是进入了死信交换机。
*/
@Test
public void testSend2ThreeDataSources() {
rabbitTemplate.convertAndSend(PrimaryRabbitMqBindConfig.PRIMARY_QUEUE_NAME, “primary message”);
business1RabbitTemplate.convertAndSend(Business1RabbitMqBindConfig.BUSINESS_1_QUEUE_NAME, “business 1 message”);
business2RabbitTemplate.convertAndSend(Business2RabbitMqBindConfig.BUSINESS_2_QUEUE_NAME, “business 2 message”);
}
@Test
public void testSend() {
/\\*
方法声明虽然是:
void convertAndSend(String routingKey, Object message) throws AmqpException;
方法的第一个参数虽然叫routingKey,但是这里调用的时候,是直接将message发送到队列RabbitMQConfig.QUEUE_NAME中去了
*/
rabbitTemplate.convertAndSend(“queue name”, “message”);
}
}
* 测试生产者
运行生产者发送消息testSend2ThreeDataSources()
发送成功
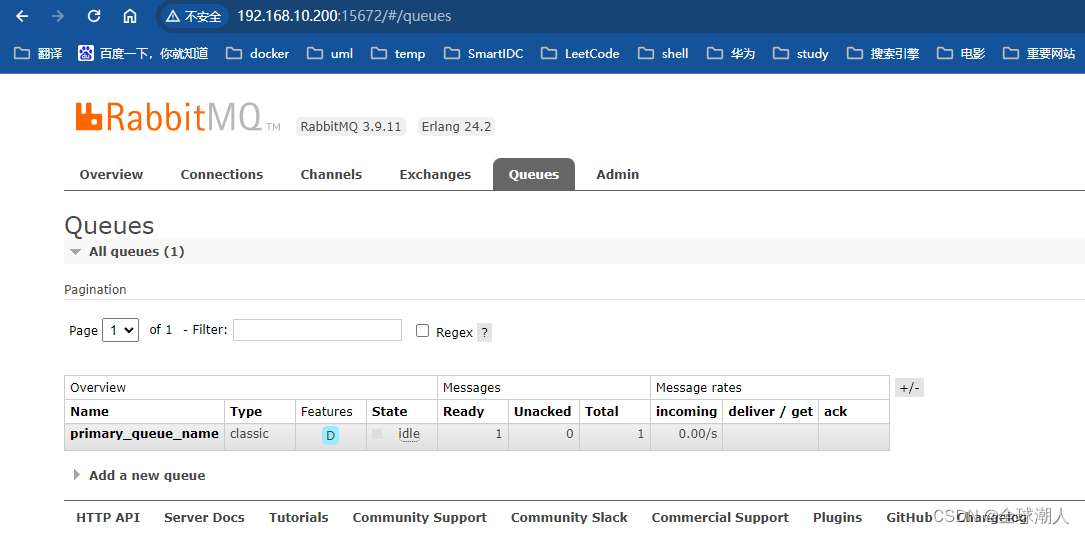
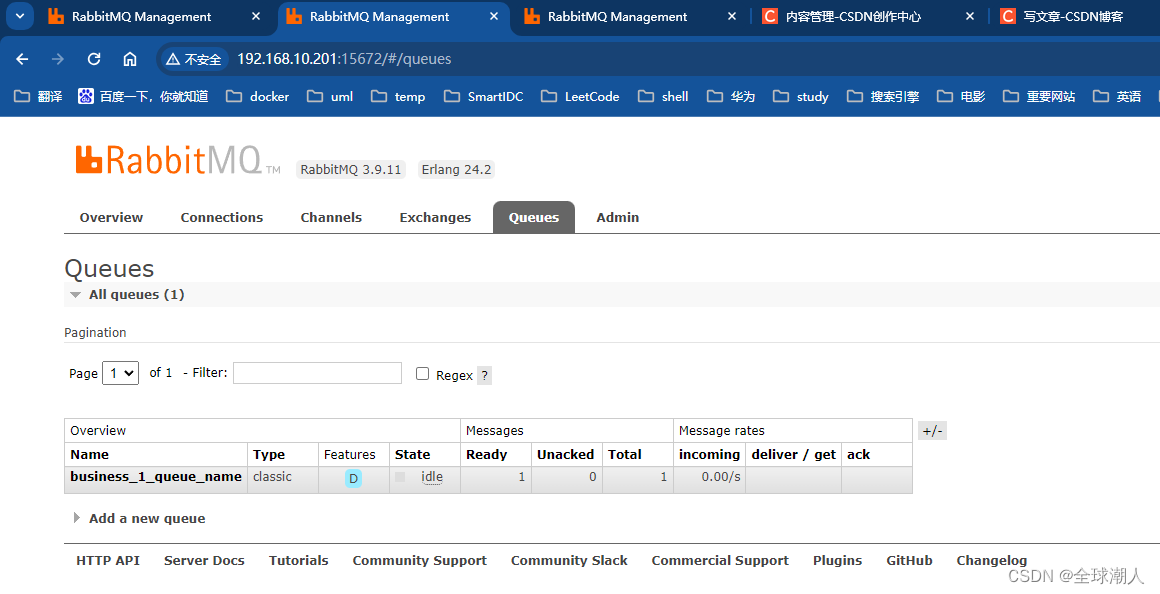
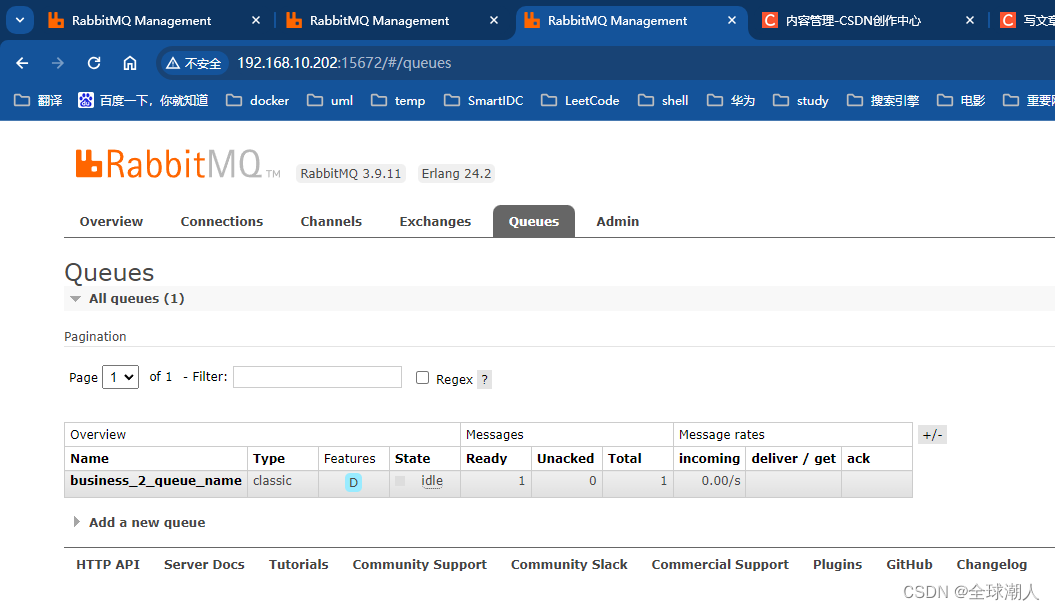
* 在rabbit mq管理平台查看
在rabbit mq管理平台查看配置类中定义并创建的队列,发现已经接收到消息,每个数据源的管理平台都可以看到,已经收到一条消息
第一个数据源的管理平台
第二个数据源的管理平台
第三个数据源的管理平台
### 消费者工程的代码与配置
* 生产者工程的application.yml配置
spring:
profiles:
include: rabbitmq
* 消费者所在工程的SpringBoot启动类
import org.springframework.boot.SpringApplication;
import org.springframework.boot.autoconfigure.SpringBootApplication;
import org.springframework.context.annotation.ComponentScan;
/**
* 由于三个RabbitMq数据源和队列相关声明全在rabbitmq-common-setting工程中,
* 而rabbitmq-common-setting工程的RabbitMq配置所在的包不在本启动类的扫描路径中,
* 所以需要使用ComponentScan来将rabbitmq-common-setting工程中RabbitMq配置所在的包名包含在扫描路径中,具体的包名是
* “com.qqcr.train.rabbitmq.multi.source.common.setting”。
* 使用了ComponentScan将包名包含在扫描路径中后,
* 还需要手动将本工程的需要扫描的包名\”com.qqcr.train.rabbitmq.multi.source.consumer\”再手动地写一下,
* 否则的话,不会将相关的类(例如:RabbitMqListener)注入到Spring容器中。
*/
@SpringBootApplication
@ComponentScan(value = {“com.qqcr.train.rabbitmq.multi.source.common.setting”, “com.qqcr.train.rabbitmq.multi.source.consumer”})
public class ConsumerApplication {
public static void main(String[] args) {
SpringApplication.run(ConsumerApplication.class, args);
}
}
* 创建三个消费者
这三个消费者分别监听三个数据源里面的三个队列
/**
* 多数据源配置监听者,参考:
* https://codeleading.com/article/71581572669/
*/
@Component
public class RabbitMqListener {
/**
* @param message
*/
@RabbitListener(queues = PrimaryRabbitMqBindConfig.PRIMARY_QUEUE_NAME, containerFactory = “primaryListenerFactory”)
public void primaryListener(Message message) {
System.out.println(“——————————————————————–”);
System.out.println(“primaryListener message:” + new String(message.getBody()));
}
/\\*\\*
最后
我想问下大家当初选择做程序员的初衷是什么?有思考过这个问题吗?高薪?热爱?
既然入了这行就应该知道,这个行业是靠本事吃饭的,你想要拿高薪没有问题,请好好磨练自己的技术,不要抱怨。有的人通过培训可以让自己成长,有些人可以通过自律强大的自学能力成长,如果你两者都不占,还怎么拿高薪?
架构师是很多程序员的职业目标,一个好的架构师是不愁所谓的35岁高龄门槛的,到了那个时候,照样大把的企业挖他。为什么很多人想进阿里巴巴,无非不是福利待遇好以及优质的人脉资源,这对个人职业发展是有非常大帮助的。
如果你也想成为一名好的架构师,那或许这份Java核心架构笔记你需要阅读阅读,希望能够对你的职业发展有所帮助。
中高级开发必知必会:
[外链图片转存中…(img-y49pELWU-1718904934294)]
#以上关于SpringBoot集成RabbitMQ配置多数据源_rabbitmq多数据源配置的相关内容来源网络仅供参考,相关信息请以官方公告为准!
原创文章,作者:CSDN,如若转载,请注明出处:https://www.sudun.com/ask/91196.html
